
Skunk2 Pro-C Coilover Install – 96-00 Civic Hatchback
I decided to replace my Koni Yellow Shock and Ground Control Coilover combo since it wasn’t quite as firm as I’d hoped for, running the shocks on full firm in the front. I was going to get some stiffer springs in the front but decided to try the Pro-C coilovers from Skunk2 instead since they had a lot more adjustability. After installing the coilovers and setting them all on full soft I was amazed that they felt very similar to the koni/ground control setup, I couldn’t wait to turn them up. I turned them up to 4 clicks and drove around again, much firmer. I could especially feel a difference around turns. I still have yet to turn them to full firm and I’ll report back once I try a few more combinations.
Product Features:
• Large Diameter Mono Tube Design
• 12-way Adjustable Precision Valving
• Shortened Shock Body and Stroke
• Adjustable Shock Length
• Adjustable Spring Preload
• Adjustable Ride Height
• SAE9254V Racing Springs
• Forged Upper Mounts
Tools Needed:
• Jack
• Jack stands
• 14mm socket and wrench
• 17mm socket and wrench
• Socket extensions
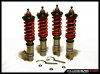
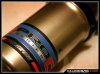
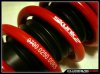
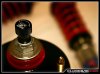
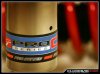
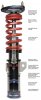
Product Photos:

The Install Process:
Front Installation
Find a solid flat area and park your car in gear with the e-brake on. Jack up the front of the car and support it with jack stands in the recommended locations (NEVER USE ONLY A JACK TO SUPPORT THE CAR WHILE WORKING UNDER IT!). You’ll also want to pop your hood.
Remove your front wheels.
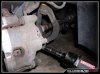
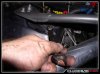
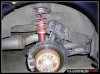
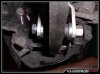
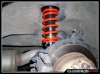
Using a 17mm socket and wrench remove the lower fork bolts. Once the nut is off tap the bolt out using a rubber mallet.
Using a 14mm socket remove the bolt at the top part of the fork holding connecting to the strut. You should then be able to wiggle and remove the fork from the strut.
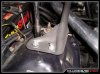
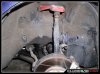
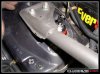
In the engine bay use a 14mm socket/wrench to remove the 2 nuts holding the shock assembly to the car. Be careful and hold the assembly so it doesn’t drop while removing the last nut.
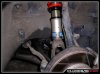
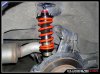
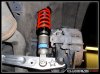
Place the new coilovers in place through the two open holes in the engine bay and secure it with the 2 nuts using a 14mm socket/wrench.
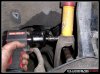
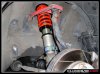
Place the lower fork onto the new coilover and install the bolt but don’t tighten it yet. Connect the fork to the lower control arm and install and tighten the nut and bolt using a 17mm socket and wrench. Go back and tighten the bolt connecting the fork to the coilover using a 14mm socket.
Double-check to make sure everything is tight and move onto the next side using the same instructions.
Rear Install
Find a solid flat area and park your car in gear with the e-brake on. Jack up the front of the car and support it with jack stands in the recommended locations (NEVER USE ONLY A JACK TO SUPPORT THE CAR WHILE WORKING UNDER IT!). You’ll also want to pop your hood.
Remove your rear wheels.
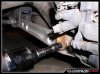
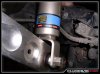
Using a 17mm socket remove the bolt connecting the shock to the lower control arm.
Using a Phillips screw driver remove the speaker cover in the rear.
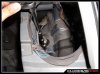
Use a 14mm with extensions to remove the 2 nuts holding the shock assembly to the car. Be careful and hold the assembly so it doesn’t drop while removing the last nut.
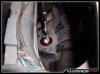
Place the new coilovers in place through the two open holes in the trunk and secure it with the 2 nuts using a 14mm socket with extensions.
Connect the coilovers to the lower control arm using the bolt you removed. Be sure to use the metal spacers if you have a 96-00 civic. The kit is for 92-00 civics and 94-01 integras but only the 96-00 civics need the spacers.
Double-check to make sure everything is tight and move onto the next side using the same instructions.
Once the installation is complete you can move onto the height adjustment.
Height Adjustment:
This coilover kit is designed to allow both race-ride and street-ride heights. It is not recommended to run race-ride height for normal street driving. This will result in more tire wear due to the excessive negative camber, which creates more stress on the wheel hubs and ball joints.
ALWAYS install the shock absorbers with the Base Cylinder at the highest position. Installing the shock absorbers with the spring perches any lower than the highest position may damage the shock absorbers and will void the warranty.
With the vehicle jacked up and secured on jack stands, raise (clockwise) or lower (counter clockwise) the Base Cylinder to the desired height. Securely tighten the lock ring against it.
Lower the vehicle to check ride height. This processed may need to be repeated until the desired ride height is achieved. Camber and toe settings will change depending on the height adjustments.
A wheel alignment is recommended after complete installation.
Complete product details:
Skunk2's competitive advantage is a carefully designed dampening curve that is based upon a decades worth of racing experience. This is what gives Skunk2 Pro-C's a quick response that optimizes grip. Skunk2 Pro-C's are the shocks that competitors aim to beat.
Skunk2 PRO-C full dampers offer the latest advanced shock technology featuring an adjustable race inspired mono-tube design for dramatically improved handling and cornering performance. The mono-tube design coupled with oversized shafts and pistons help make the PRO-C damper extremely responsive and durable. Each PRO-C kit features precise 12-way adjustable valving and come with CNC-machined forged top mounts with spherical bearings or polyurethane bushings for maximum performance and feel; and have been tested extensively on the street and track. PRO-C dampers features shortened shock bodies and shafts to maintain proper suspension travel on lowered vehicles. Most PRO-C shock bodies are adjustable to allow additional height and preload adjustment and allow the driver to dial in all aspects of the vehicle balance and feel.
Click here to download Skunk2’s part/installation sheet.
I decided to replace my Koni Yellow Shock and Ground Control Coilover combo since it wasn’t quite as firm as I’d hoped for, running the shocks on full firm in the front. I was going to get some stiffer springs in the front but decided to try the Pro-C coilovers from Skunk2 instead since they had a lot more adjustability. After installing the coilovers and setting them all on full soft I was amazed that they felt very similar to the koni/ground control setup, I couldn’t wait to turn them up. I turned them up to 4 clicks and drove around again, much firmer. I could especially feel a difference around turns. I still have yet to turn them to full firm and I’ll report back once I try a few more combinations.
Product Features:
• Large Diameter Mono Tube Design
• 12-way Adjustable Precision Valving
• Shortened Shock Body and Stroke
• Adjustable Shock Length
• Adjustable Spring Preload
• Adjustable Ride Height
• SAE9254V Racing Springs
• Forged Upper Mounts
Tools Needed:
• Jack
• Jack stands
• 14mm socket and wrench
• 17mm socket and wrench
• Socket extensions
Product Photos:
The Install Process:
Front Installation
Find a solid flat area and park your car in gear with the e-brake on. Jack up the front of the car and support it with jack stands in the recommended locations (NEVER USE ONLY A JACK TO SUPPORT THE CAR WHILE WORKING UNDER IT!). You’ll also want to pop your hood.
Remove your front wheels.
Using a 17mm socket and wrench remove the lower fork bolts. Once the nut is off tap the bolt out using a rubber mallet.
Using a 14mm socket remove the bolt at the top part of the fork holding connecting to the strut. You should then be able to wiggle and remove the fork from the strut.
In the engine bay use a 14mm socket/wrench to remove the 2 nuts holding the shock assembly to the car. Be careful and hold the assembly so it doesn’t drop while removing the last nut.
Place the new coilovers in place through the two open holes in the engine bay and secure it with the 2 nuts using a 14mm socket/wrench.
Place the lower fork onto the new coilover and install the bolt but don’t tighten it yet. Connect the fork to the lower control arm and install and tighten the nut and bolt using a 17mm socket and wrench. Go back and tighten the bolt connecting the fork to the coilover using a 14mm socket.
Double-check to make sure everything is tight and move onto the next side using the same instructions.
Rear Install
Find a solid flat area and park your car in gear with the e-brake on. Jack up the front of the car and support it with jack stands in the recommended locations (NEVER USE ONLY A JACK TO SUPPORT THE CAR WHILE WORKING UNDER IT!). You’ll also want to pop your hood.
Remove your rear wheels.
Using a 17mm socket remove the bolt connecting the shock to the lower control arm.
Using a Phillips screw driver remove the speaker cover in the rear.
Use a 14mm with extensions to remove the 2 nuts holding the shock assembly to the car. Be careful and hold the assembly so it doesn’t drop while removing the last nut.
Place the new coilovers in place through the two open holes in the trunk and secure it with the 2 nuts using a 14mm socket with extensions.
Connect the coilovers to the lower control arm using the bolt you removed. Be sure to use the metal spacers if you have a 96-00 civic. The kit is for 92-00 civics and 94-01 integras but only the 96-00 civics need the spacers.
Double-check to make sure everything is tight and move onto the next side using the same instructions.
Once the installation is complete you can move onto the height adjustment.
Height Adjustment:
This coilover kit is designed to allow both race-ride and street-ride heights. It is not recommended to run race-ride height for normal street driving. This will result in more tire wear due to the excessive negative camber, which creates more stress on the wheel hubs and ball joints.
ALWAYS install the shock absorbers with the Base Cylinder at the highest position. Installing the shock absorbers with the spring perches any lower than the highest position may damage the shock absorbers and will void the warranty.
With the vehicle jacked up and secured on jack stands, raise (clockwise) or lower (counter clockwise) the Base Cylinder to the desired height. Securely tighten the lock ring against it.
Lower the vehicle to check ride height. This processed may need to be repeated until the desired ride height is achieved. Camber and toe settings will change depending on the height adjustments.
A wheel alignment is recommended after complete installation.
Complete product details:
Skunk2's competitive advantage is a carefully designed dampening curve that is based upon a decades worth of racing experience. This is what gives Skunk2 Pro-C's a quick response that optimizes grip. Skunk2 Pro-C's are the shocks that competitors aim to beat.
Skunk2 PRO-C full dampers offer the latest advanced shock technology featuring an adjustable race inspired mono-tube design for dramatically improved handling and cornering performance. The mono-tube design coupled with oversized shafts and pistons help make the PRO-C damper extremely responsive and durable. Each PRO-C kit features precise 12-way adjustable valving and come with CNC-machined forged top mounts with spherical bearings or polyurethane bushings for maximum performance and feel; and have been tested extensively on the street and track. PRO-C dampers features shortened shock bodies and shafts to maintain proper suspension travel on lowered vehicles. Most PRO-C shock bodies are adjustable to allow additional height and preload adjustment and allow the driver to dial in all aspects of the vehicle balance and feel.
Click here to download Skunk2’s part/installation sheet.
Attachments
-
 61 KB Views: 548
 -
 52.4 KB Views: 542
 -
 51.2 KB Views: 543
 -
 49 KB Views: 545
 -
 44.9 KB Views: 538
 -
 42.6 KB Views: 540
 -
 49.7 KB Views: 538
 -
 64.8 KB Views: 542
 -
 77 KB Views: 536
 -
 75.2 KB Views: 540
 -
 60.3 KB Views: 535
 -
 73.4 KB Views: 541
 -
 67.2 KB Views: 532
 -
 82.3 KB Views: 534
 -
 73.2 KB Views: 532
 -
 81.2 KB Views: 17
 -
 67.2 KB Views: 528
 -
 74.4 KB Views: 527
 -
 58.2 KB Views: 529
 -
 57.3 KB Views: 796
 -
 63.3 KB Views: 798
 -
 83.3 KB Views: 527
 -
 54.1 KB Views: 525
 -
 81.5 KB Views: 522
 -
 74.9 KB Views: 522
 -
 41.1 KB Views: 523
 -
264.6 KB Views: 39
Last edited: