HID Retro-Fit: JDM ITR Headlights w/ S2000 Projector & Ballast [Still in the WORKs!]

DailyDB8

>>>Honda Enthusiast<<<
**NOTE- THE WRITE-UP IS STILL IN THE WORKs** - once project is completed there will be a more detailed write up, so as of right now, im doing a lilttle more research before i "wing" it... lol. so any tips / help / advice is appreciated! :thumbup:


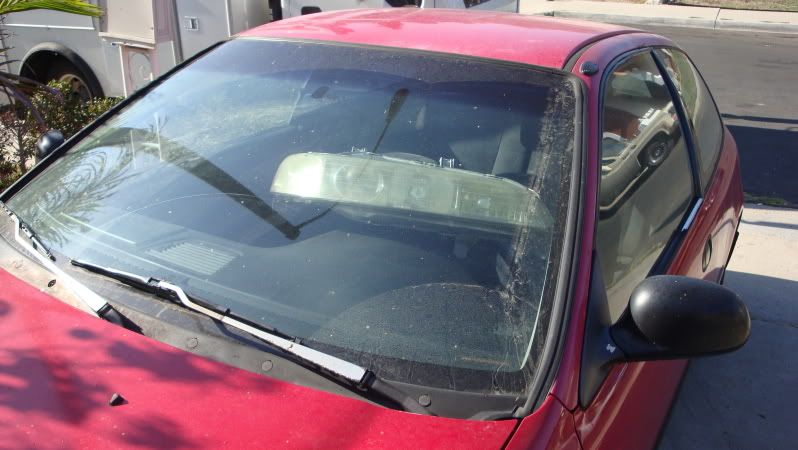
Club-Integra doesn't have a lot of how to's, so lets get the ball rolling. Ever since i saw a set of S2000 HIDs in a buddies car, i fell in love with the output and the cutoff of the HIDs. so BEAUTIFUL, ive seen better setups from bmw / benz / etc, but i just had my mind set on the S2000s. Long story short, i came across a buy and i picked these babies up. Complete and working, the seller drove to my house and tested it and removed it from S2000 on spot. what a nice guy. So yea, retro fit is in the working and i've been skimming through the forums to get a basic ideas, so a write up will made with the help of you guys :p


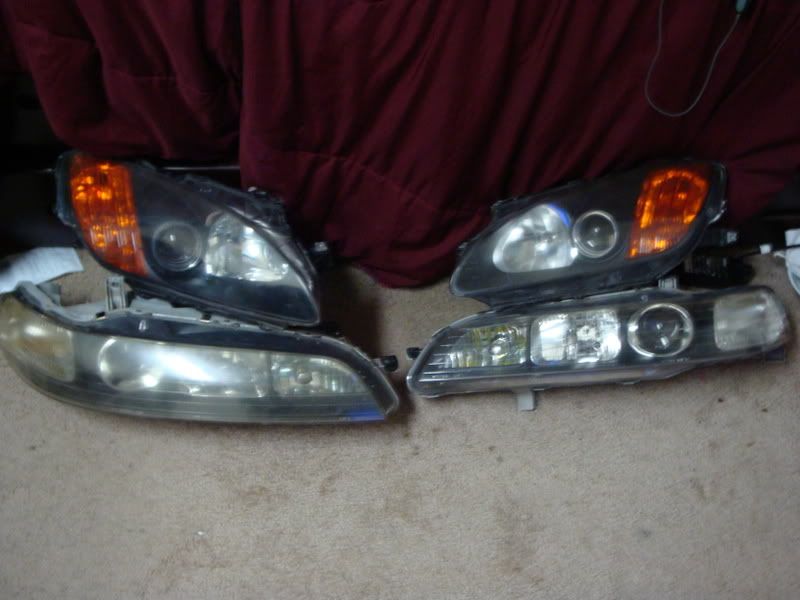
Project: S2000 HID Retro-Fit inside JDM Integra Type R Headlights

Tools/Equipment:
Oven
Hand Dremel [ Cutter Disc & Drill ]
Phillip & Flathead Screwdriver
Hand Pry-Bar or a Chizzel or a butter knife
10mm Wrench/Socket
Gloves
Permanent Marker
Masking Tape
JB Weld
misc Bolts/Washers/Spacers [ more details on that once completed ]

Parts:
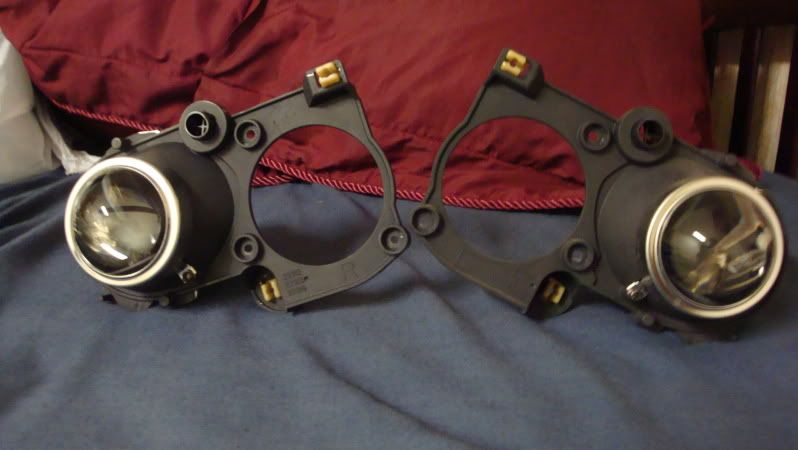
2x AP1 S2000 Projectors
2x AP1 S2000 Ballasts
2x AP1 S2000 Ignitors
2x Phillips D2S 5000k Bulbs
2x DC2 JDM Integra Type R / SIR-G Headlights

Steps/Proceedure:
#1 -- have time to actually do the project first!!! :p 
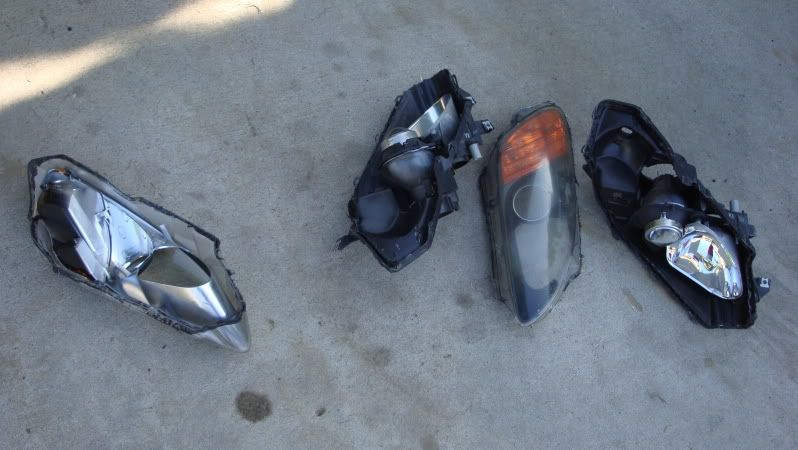
im thinking a good afternoon - evening type deal to get it done right.
#2 -- Disassemble the Headlights; bulbs, rubber grommets, wiring, etc. Remove any necessary screws and unclip the surrounding lens and rear cover to lossen the casing when the sealent gets soft later.
#3 -- Pre-Heat oven to 300F and place Headlamps in the oven. Make sure the headlights dont touch anything metal or it will melt. I've seen folks use blocks of wood [ birch ] on the oven rack or a oven pan with cookie sheet.

now im not sure if i want of the the oven ON or OFF while the headlights are in. im thinking about leaving it off and placing it in there for a longer period... or leave it on and leaving it in there for a shorter period... until the sealent gets soft enough to easily pry off, if anything i have a heat gun in case... :what: whatevers


Disassebling Headlights


NOTE: Before you start heating up the headlights and get ready to pry it open, look around on the rear housing to make sure all the clips/tab and screws are open/removed.

depending on your choice of method to heat up the sealant, choose a corner and pry the lens and the back housings apart. i used a flathead and a small pry bar to gain a small entry point and worked my way from there from one end and pry them open VERY SLOWLY. use a razor or a the flathead to cut the sealant as it streches.


breaking it down even more to what we need... i think.


TOO BE CONTINUED... these are the plans and we'll see how it goes... i'll be sure to include pics :thumbs up


looks like i will include a write up on how to bling the lens too! 8) . One thing i do need help is, how do i resotre the chrome in the housing? over time sometimes the chrome paint starts peeing off. will the chrome spray cans do the trick?

Anyone that has pics, info, advice, suggestions, comments, feel free to chime in! :thumbup:
 
Last edited:

DailyDB8

>>>Honda Enthusiast<<<
and 5 months later... i start working on the retrofit!... ROFL.

Soooo... i decided to do something out of the ordinary in this mini heat of the summer. I baked the S2000 headlights by placing them on the dashboard on my eg... hahahaha. and guess what, it worked! gotta be green and help out the earth :p Down side is that it takes awhile.... i think. i left them on the dash for about 6 hours. was only able to do the s2000 headlights today, and the itrs another day.

from this experiment... its not a bad way of doing it, but it needs to be a lil hotter, i might try using the heat gun next time and try a more specific method, or jus toss it in the oven all together. this method of baking it in the car is pretty cave man'ish. got the job done... but it didn't look to pretty for the rear housing of the s2000 headlights.


Last edited:

mirrorimg

Well-Known Member
I know my JDM headlights dont fit in my oven. You need to be careful when using a heatgun and prying the lights apart, if you stretch it too far you risk warping the housings a bit. You may not notice until you re-install and the lights dont sit properly on the bumper support.
 

DailyDB8

>>>Honda Enthusiast<<<
I know my JDM headlights dont fit in my oven. You need to be careful when using a heatgun and prying the lights apart, if you stretch it too far you risk warping the housings a bit. You may not notice until you re-install and the lights dont sit properly on the bumper support.
haha i arleady included the damage a couple mins before your post
 

mirrorimg

Well-Known Member
I did see that, but you damaged the S2K housings that you are trashing anyways, (right?). It would be another story to mess up your JDM lights. Im interested in how this turns out. After I have all the maintenance done on my teg I plan on doing a retro also. That isnt anytime soon though ;)


DailyDB8

>>>Honda Enthusiast<<<
I did see that, but you damaged the S2K housings that you are trashing anyways, (right?). It would be another story to mess up your JDM lights. Im interested in how this turns out. After I have all the maintenance done on my teg I plan on doing a retro also. That isnt anytime soon though ;)
yea, i wanted to experiment with the s2000 headlights to see what not to do, i wasn't specific about the itr lights since i haven't started... at oe point i jus thought about hacking up the head lights with a dremel... hahaha but i figured it would be better with some pratice... this i gotta really plan out. and you're right, this is the hard part. making the itr headlights look like it was never opened... resealing it too i havent really thought about yet either, but i got some ideas.

1st headlight... i tried scrapping the sealant thinking it would make things easier... wrong. tried prying softly around the headlight thinking it would help... wrong. took me 15 mins...

2nd headlight... started at a corner, created a small break/crack at one corner, however it pried open all the way back at point of entry. as i slowly pried it back, i opened the tabs... took me like 5 mins total

with the itr lights, aside from baking it in the car again, i wanna try use the heatgun at one entry point, i want it hotter than it was in the car to get the sealant softer and prying it with a small pocket size flat head... and also heat up the spots with the tabs... we'll see how that goes
 
Last edited:

mirrorimg

Well-Known Member
If you google resealing headlights, theres a sealant that you can get through Nissan dealers I believe, which works much the same as the OEM sealant. I dont know a part number or what its called, but it would be much better than using RTV silicone.
 

jdmjim

nothing from nowhere
i just took mine apart to paint the housings black, i regret not taking the clear corner lens off to rechrome in there. i used some bumper chrome spray to touch up a couple of spots, it didn't work very well' but it looks better than the brown/tan underneath
 
Top