Prozon
Kris
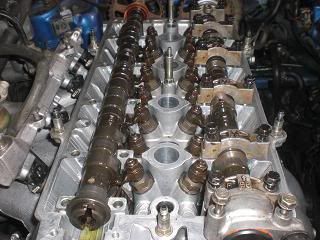
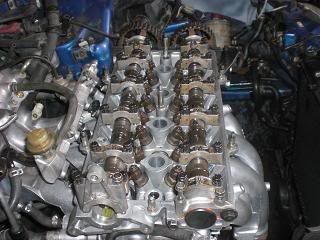
So you have a bad head gasket huh? Well here is a little write up on how to change it.
I'm going to go through this with assuming you have some basic wrenching knowledge.
Ask questions if you need help.
Tools Needed:
Ratchet & Extensions
10MM Socket and Wrench
12MM Socket and Wrench
17MM Socket and Wrench
Breaker Bar
Crank Pulley Tool - OR - Good impact gun.
Torque Wrench
Phillips Head/Flat Head Screwdrivers
Pliers
Floor Jack w/ Jack Stands
Feeler gauges. (For adjusting valve lash after reinstalling it all.)
Cardboard large enough to store everything on.
Parts Needed:
Head Gasket
Timing Belt
Water Pump
Oil Filter
Oil and Coolant
ARP Head Studs or new head bolts recommended.
Other Costs:
You will need to take the head to a machine shop to make sure it is not cracked. Have it tested in every way you can.
Steps:
Jack the car up and put it on jack stands. I prefer to put them just behind the rear tires under the car.
When you are sure they are in a good location you may remove the jack.
Remove the four lug nuts and remove the drivers side tire.

Remove the inner fender well so that you have access to the crankshaft pulley.
With the 17mm socket or wrench, remove the drain plug from the oil pan and drain out all of the oil. If the oil is more of an ugly sludge, you may want to pour some diesel in to flush out all of the sludge in the motor. If it's super bad, remove the pan and clean it. This isn't necessary unless the oil is almost solid. (Yes I have seen it happen.)
On the passenger side end of the radiator there should be a drain plug. Remove it and drain all of the coolant out.
Disconnect the negative cable from the battery and unbolt the ground wire from the head.
Disconnect the air intake and get it out of the way. This part should be fairly straight forward. Undo the hose clamp on the throttle body and pull away the intake piping.
Second Generation Integra's Only
Loosen the adjustment nut on the clutch cable until it is loose enough to remove. Then move it out of the way.
Using two 12mm wrenches loosen the nuts on the throttle cable until you can unhook it from the throttle assembly and then move it out of the way. Remove the hose on the middle of the intake for the PCV valve while you are at it.
Loosen the tensioner (10mm) on the power steering pump and remove the PS belt.
Remove the two bolts (12mm) from the power steering pump holding the pump on to the brackets. One bracket is on the block and one bracket is on the head.
With the pliers or screwdriver, remove the clamp from the hose on the power steering pump. Remove the hose and move the pump to the side. I put it over by the windshield cowl.
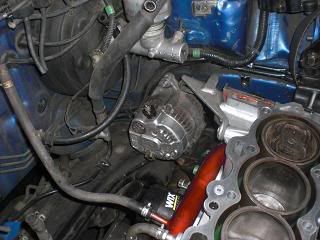
Remove the alternator top bolt and loosen the bottom bolt. Remove the belt. Leave the alternator attached.
Disconnect all of your vacuum lines. Be sure to mark them with tape or take pictures if you do not think you will remember how to hook them back up.
Unplug these three connectors on the drivers side of the engine bay along the firewall.
We will want to remove the wiring going over the top of the intake manifold.
Remove the two 10 or 12mm nuts holding the injector wiring on.
Using a flathead screwdriver, pop the metal clips off the fuel injectors so you can remove the plugs.
There may be some random 10mm bolts holding the harness to the body.
Your harness should be free from the top of the engine.
Remove the wiring under the intake.
Oil pressure sensor, one wire.
Coolant Temperature Sensor, two wires-green plug.
Alternator wiring, one green plug, one bolt on wire with a 10mm nut.
Your wiring harness should now be free from the bottom of the engine. Pull the whole wiring harness out of the engine bay and flop it out over the fender to get it out of the way.
~CONTINUED ON THE NEXT POST~
I'm going to go through this with assuming you have some basic wrenching knowledge.
Ask questions if you need help.
Tools Needed:
Ratchet & Extensions
10MM Socket and Wrench
12MM Socket and Wrench
17MM Socket and Wrench
Breaker Bar
Crank Pulley Tool - OR - Good impact gun.
Torque Wrench
Phillips Head/Flat Head Screwdrivers
Pliers
Floor Jack w/ Jack Stands
Feeler gauges. (For adjusting valve lash after reinstalling it all.)
Cardboard large enough to store everything on.
Parts Needed:
Head Gasket
Timing Belt
Water Pump
Oil Filter
Oil and Coolant
ARP Head Studs or new head bolts recommended.
Other Costs:
You will need to take the head to a machine shop to make sure it is not cracked. Have it tested in every way you can.
Steps:
Jack the car up and put it on jack stands. I prefer to put them just behind the rear tires under the car.
When you are sure they are in a good location you may remove the jack.
Remove the four lug nuts and remove the drivers side tire.

Remove the inner fender well so that you have access to the crankshaft pulley.
With the 17mm socket or wrench, remove the drain plug from the oil pan and drain out all of the oil. If the oil is more of an ugly sludge, you may want to pour some diesel in to flush out all of the sludge in the motor. If it's super bad, remove the pan and clean it. This isn't necessary unless the oil is almost solid. (Yes I have seen it happen.)
On the passenger side end of the radiator there should be a drain plug. Remove it and drain all of the coolant out.
Disconnect the negative cable from the battery and unbolt the ground wire from the head.


Disconnect the air intake and get it out of the way. This part should be fairly straight forward. Undo the hose clamp on the throttle body and pull away the intake piping.
Second Generation Integra's Only
Loosen the adjustment nut on the clutch cable until it is loose enough to remove. Then move it out of the way.

Using two 12mm wrenches loosen the nuts on the throttle cable until you can unhook it from the throttle assembly and then move it out of the way. Remove the hose on the middle of the intake for the PCV valve while you are at it.

Loosen the tensioner (10mm) on the power steering pump and remove the PS belt.

Remove the two bolts (12mm) from the power steering pump holding the pump on to the brackets. One bracket is on the block and one bracket is on the head.
With the pliers or screwdriver, remove the clamp from the hose on the power steering pump. Remove the hose and move the pump to the side. I put it over by the windshield cowl.

Remove the alternator top bolt and loosen the bottom bolt. Remove the belt. Leave the alternator attached.
Disconnect all of your vacuum lines. Be sure to mark them with tape or take pictures if you do not think you will remember how to hook them back up.


Unplug these three connectors on the drivers side of the engine bay along the firewall.

We will want to remove the wiring going over the top of the intake manifold.

Remove the two 10 or 12mm nuts holding the injector wiring on.

Using a flathead screwdriver, pop the metal clips off the fuel injectors so you can remove the plugs.

There may be some random 10mm bolts holding the harness to the body.

Your harness should be free from the top of the engine.
Remove the wiring under the intake.
Oil pressure sensor, one wire.
Coolant Temperature Sensor, two wires-green plug.
Alternator wiring, one green plug, one bolt on wire with a 10mm nut.
Your wiring harness should now be free from the bottom of the engine. Pull the whole wiring harness out of the engine bay and flop it out over the fender to get it out of the way.
~CONTINUED ON THE NEXT POST~
Last edited: