
How do I align my front bumper and hood?
- Thread starter HersTEG
- Start date


Samurai_Blue
Yolo Whippin'
sorry dude you arent gonna have fitment without an oem bumper
nathan_carmona
Gold Member
well if you trust your ghetto fab skills you can start widening the holes where the screws go so it will shift a bit and start shaving down areas of the bumper that start to hit the oem pieces of your car
not as good as just getting an oem bumper but if you take your time, it will reduce the gap
not as good as just getting an oem bumper but if you take your time, it will reduce the gap
here&there
In St. Louis, MO
When you finish adjusting the brackets, Don't Close The Hood, instead lower it slowly and make sure that it does not chip the paint on the fenders.
You need at least one buddy, but two would be better. Get a fine line majic marker and draw a line around your hood bracket bolts (4 ea on each side) that attach to both the hood and the body of the car.
This is the refference point and you can return the brackets and hood, to this location, if all future adjustments fail.
Here are the 2 proceedures that I used when I installed my non-oem hood:
1st
Loosen the brackets that bolt down to the body of the car. Slide the brackets (with the hood still attached) towards the headlights/bumper, as much as possible. Then tighten those bolts.
Loosen the bolts that attach the brackets to the hood and slide the hood as far forward and you can. Then tighten the bolts.
Don't close the hood! You might have shifted it too far, to one side or the other, and you will chip your paint.
Gently lower the hood and verity that it will not make contact with your fenders.
Loosen and tighten the hood to bracket bolts as necessary, to prevent painmt chipping.
Once you get it lined up, as good as you can, you have to look at the hood next to the windshield. Does it look like its lines are flowing or have you moved the hood too far forward? I was able to slide my hood even farther forward, without effecting the lines, but I had to file out my brackets, as mentioned in the next step:
2nd
This is the getto style the nathon_carmona is refering to:
If the lines look ok (by the windshield), but the hood still needs to slide forward, there is one more thing that you can do.
Remove the 4 bolts that attch the brackets to the body of the car and lift the hood completely off the car.
Put the hood, upside down, on a thick bedspread and get a 1/8" round metal file.
Each of the brackets have 2 holes where the 'body' bolts go.
File, no more than 1/4" off of one side, of each of the 4 holes. The hole will become more oval in shape.
The side that you file (enlarge) is the edge of the hole that will be closest to the windshield, when the hood is closed.
Bolt the hood back on the car and slide it as far forward as you can, and tighten up the bolts.
Gently close the hood and see how much you need to adjust the brackets that attach to the hood. (you should not need to readjust the bracket bolts that you filed out.
You may have to readjust it a couple of times, but if you don't like lyour results, you can return the bolts to the original majic marker marks, which you made.
Last edited:
nathan_carmona
Gold Member
What you said about the hood is right on with everything being oem but if he re alines his hood, it won't be in line with his fenders. The gap is most likely 100% due to the aftermarket bumperWhen you finish adjusting the brackets, Don't Close The Hood, instead lower it slowly and make sure that it does not chip the paint on the fenders.
You need at least one buddy, but two would be better. Get a fine line majic marker and draw a line around your hood bracket bolts (4 ea on each side) that attach to both the hood and the body of the car.
This is the refference point and you can return the brackets and hood, to this location, if all future adjustments fail.
Here are the 2 proceedures that I used when I installed my non-oem hood:
1st
Loosen the brackets that bolt down to the body of the car. Slide the brackets (with the hood still attached) towards the headlights/bumper, as much as possible. Then tighten those bolts.
Loosen the bolts that attach the brackets to the hood and slide the hood as far forward and you can. Then tighten the bolts.
Don't close the hood! You might have shifted it too far, to one side or the other, and you will chip your paint.
Gently lower the hood and verity that it will not make contact with your fenders.
Loosen and tighten the hood to bracket bolts as necessary, to prevent painmt chipping.
Once you get it lined up, as good as you can, you have to look at the hood next to the windshield. Does it look like its lines are flowing or have you moved the hood too far forward? I was able to slide my hood even farther forward, without effecting the lines, but I had to file out my brackets, as mentioned in the next step:
2nd
This is the getto style the nathon_carmona is refering to:
If the lines look ok (by the windshield), but the hood still needs to slide forward, there is one more thing that you can do.
Remove the 4 bolts that attch the brackets to the body of the car and lift the hood completely off the car.
Put the hood, upside down, on a thick bedspread and get a 1/8" round metal file.
Each of the brackets have 2 holes where the 'body' bolts go.
File, no more than 1/4" off of one side, of each of the 4 holes. The hole will become more oval in shape.
The side that you file (enlarge) is the edge of the hole that will be closest to the windshield, when the hood is closed.
Bolt the hood back on the car and slide it as far forward as you can, and tighten up the bolts.
Gently close the hood and see how much you need to adjust the brackets that attach to the hood. (you should not need to readjust the bracket bolts that you filed out.
You may have to readjust it a couple of times, but if you don't like lyour results, you can return the bolts to the original majic marker marks, which you made.
nathan_carmona
Gold Member
does it line up with the fenders? Can we get a side shot?
mirrorimg
Well-Known Member
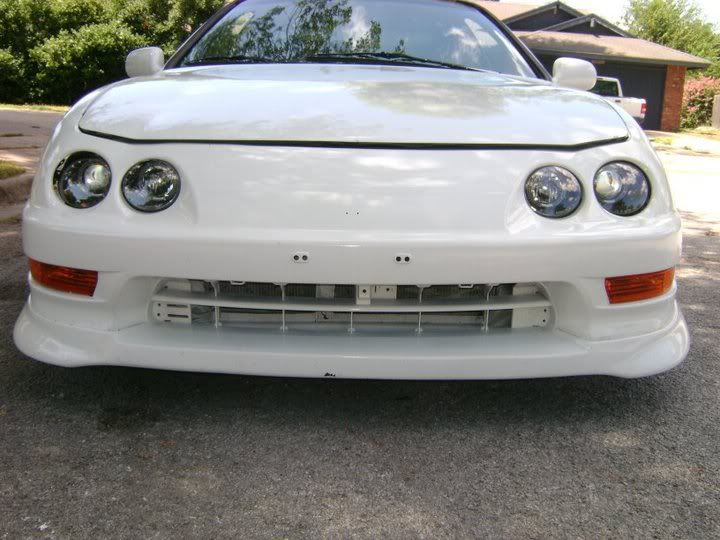
This could be true. The bumper was obviously painted in the above picture, the grille is black. This could be a shaved and repainted bumper, but why wouldnt they shave the license plate holes as well.My bumper is OEM but I filled the integra symbol so I am not sure you can tell by that alone.
Do you guys see the massive gap between the bumper and the passenger headlight? it looks like you can see right into the fender. I would try to adjust the hood to bring it forward some by adjusting the hinges in the back.
redrocket
New Member
This could be true. The bumper was obviously painted in the above picture, the grille is black. This could be a shaved and repainted bumper, but why wouldnt they shave the license plate holes as well.
Do you guys see the massive gap between the bumper and the passenger headlight? it looks like you can see right into the fender. I would try to adjust the hood to bring it forward some by adjusting the hinges in the back.
Your absolutely right, you would think that whoever took the time to fill the integra symbol would have shaved the holes. Although the license plate holes are tricky because they are raised so you have to cut and do some plastic welding.