
bottlejunkie
New Member
keep in mind this writeup was done a few months after install, so not all the pics are there, i left out the pretty much obvious stuff. so here goes, this is a 93 integra RS, but all other hondas will be nearly identical.
1. remove negative battery terminal and intake arm assembly (intake pipe if you have aftermarket intake).
2. you have to figure out where you want to mount the NMU (nitrous management unit). keep in mind the stainless braided line is only 24" from the NMU to the nozzle, so make sure you have the NMU within 24" of where the N20 nozzle will be in the intake arm.
3. once you have the location picked out mount the NMU using the 4 included self tapping screws.
4. next, find a suitable ground close to the NMU location (shorter = better), i used a bolt near the brake proportioning valve. once you find the spot, route the wire to the location, cut to lenght, and crimp on supplied ground eyelet and attach.

5.find a nearby grommeted hole in the firewall, route the red lead on the NMU through that grommet into the passenger compartment. i chose the a/c line through-way only because the previous owner had the amp power wire ran through it already.
6. next, find the TPS connector and locate the middle wire (output voltage lead) its the center wire, red with a blue tracer to be exact. using the supplied T-tap crimp it around the wire, and route the WHITE wire from the NMU to it, cut it to lenght, crimp on the supplied male spade connector and connect them. *no pic here simple though* if needed i can get a picture
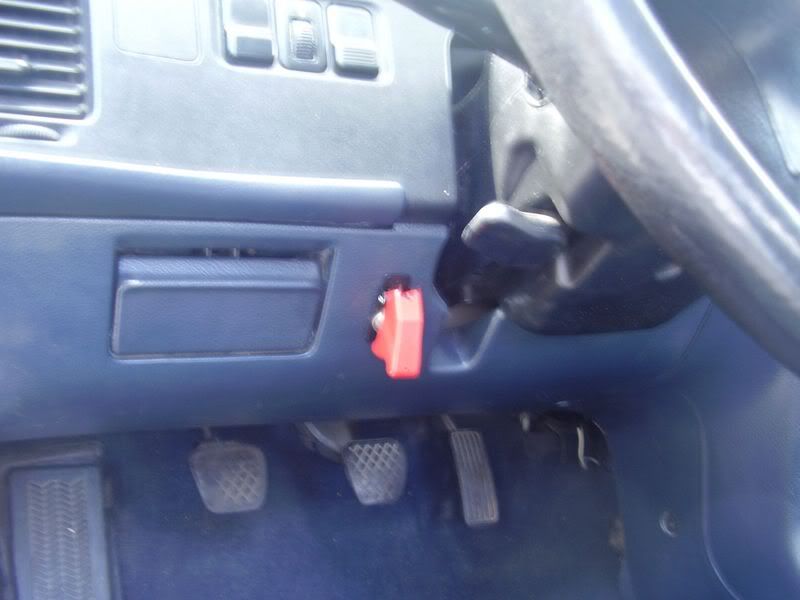
7. inside the passenger compartment now, decide where you want your arming switch. you will have to drill a 1/2" hole to mount the switch. with the switch mounted route the FUSED lead to a NON-used 12v ignition on source. i used a female spade connector and ran it directly to the male connector in the fusebox.
8. the other lead on the arming switch connect using the supplied quick connect to the RED wire on the NMU (the one you pushed through the firewall in step #5.
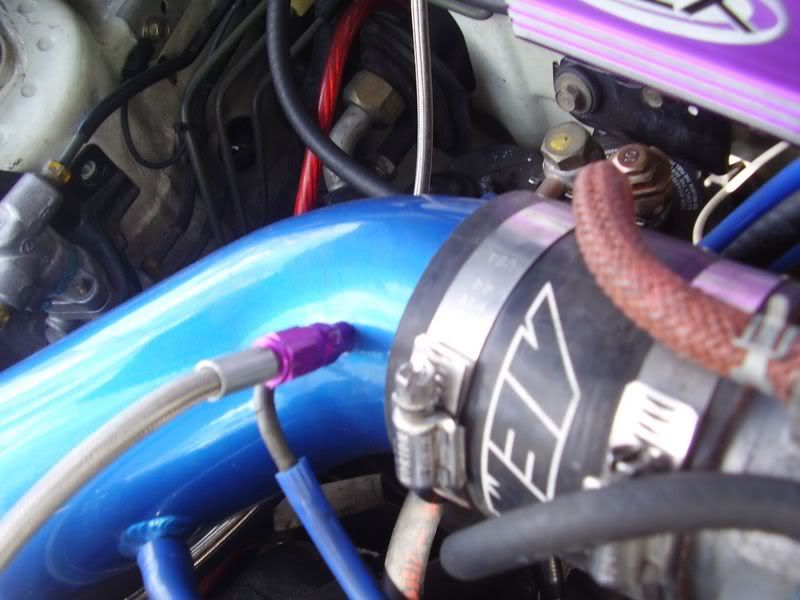
9. decide where you are going to mount the N20 nozzle in the intake arm. this step is pretty simple as optimal position is 6-12" from the throttle body, although, mine is closer just for the fact that my AEM CAI already had a 1/16" hole, using the supplied tap i tapped the hole and screwed the nozzled directly into the intake. if you are using one without an existing hole, or the factory plastic intake arm, you will need to drill a 1/2" hole, stick the provided bung through it, screw the nut to the inside (locktight is recommended) and screw the N20 nozzle into the bung. the nozzle has a dimple in one side indicating the direction of flow, you want it to face the throttle body of coarse.
10. install the N20 jet into the end of the nozzle and connect the supplied 24" stainless braided line to the nozzle and the other end to the NMU.
11. next, install corresponding fuel jet into NMU bung marked INTAKE, and using supplied nut and vacuum bung secure it to the NMU. find an unused vacuum source on the intake manifold and run the 3/16" vacuum line from the INTAKE bung on the NMU to that source. if you dont have an unused nipple on the intake manifold just T into one somewhere. secure both ends of the vacuum line with the supplied hose clamps
12. locate the fuel pressure regulator vacuum line, cut it directly in the middle and install vacuum T, using supplied 3/16" vacuum line connect vacuum line from T to NMU bung marked REGULATOR. secure both ends using supplied hose clamps. i use electrical tape over my T because its plastic and if it breaks it will cause you to run lean while spraying, the electrical tape will prevent any leaks if the T breaks.
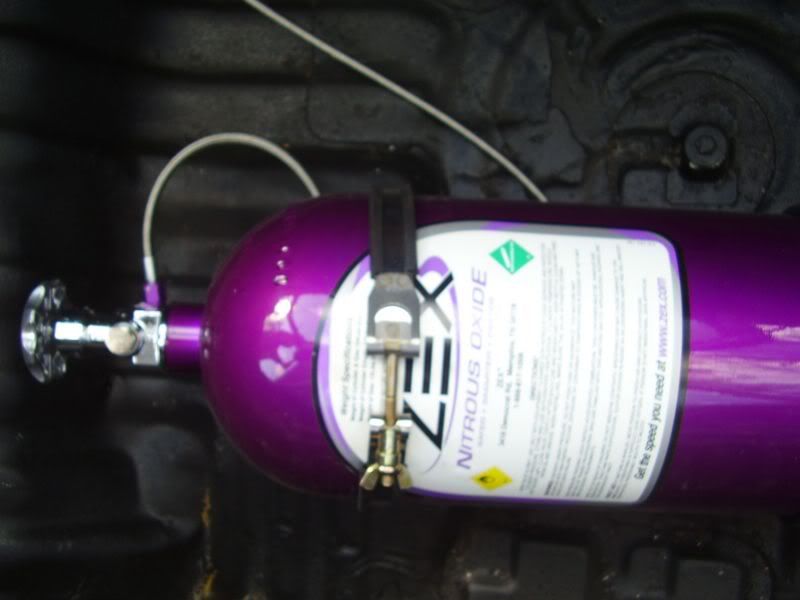
13. now its time to mount the bottle, i placed the brackets on my bottle as far apart as i wanted them, and measured the distance from mount to mount. i then took the mounts inside the car and sat one down, marked where the holes needed to be, drilled the 2 5/16" holes and mounted that bracket, measured to get the distance apart from it i wanted and did the same for the other bracket, bolted them both down with the supplied nuts/bolts/washers, i grabbed some lock washers from work to make sure they stayed put. once the brackets were mounted i sprayed the bottom of the holes with undercoating, to prevent rust, road noise, and debri from entering the cabin of the car.
14. mount your bottle into the brackets noting the position is correct. one bracket is taller so the bottle does not lay flat. the label is to face up, and the fill valve end is to be higher than the flat end.
15. time to route your N20 supply line from the bottle to the NMU. its recommended to do this under the car by zex, nx, nos, holley, etc. but seeing as how our honda/acuras have all the fuel lines running inside the car i decided to use the same routing location. i pulled the bottom of the rear seat out, and the drivers side carpet trim up revealing all the fuel lines. i found a hole in the firewall beside the throttle cable that looked like a good place to enter the engine bay (still need to grommett that hole), and connected the N20 supply line to the NMU.
16. time to reconnect the battery, but do not install the intake arm to the throttle body yet. recheck all N20 connections are tight and open N20 bottle, check for leaks at ALL connections. if all connections seem good, turn bottle off.
17. programming the NMU to your TPS voltage curve. turn key on (engine OFF), activate arming switch, push the button on the NMU, the light should then glow solid red, return to driver seat and hold throttle to the floor for 10 FULL seconds, release throttle and look at light on the NMU, it should be flashing now, red green off red green off red green off, this shows that it has learned your TPS curve. turn arming switch off, leave ignition on, turn arming switch back on and the light on the NMU should now be solid GREEN, indicating that the system is armed.
18. open N20 bottle slowly, get back in drivers seat, and open the throttle WIDE OPEN until you see nitrous purging out your intake tube. this purges any trash that may be in the line as well as removes the air from the line.
19. FINALLY, turn off N20 arming switch, turn ignition OFF. re-install intake arm, recheck ALL connections, and wires are free of moving or hot engine parts.
20. GO FOR A SPIN, it is not recommended to activate N20 under 2500rpm, or in 5th gear (although 5th is fine in my opinion as long as RPM isnt under 3k, but this is sheer opinion)
i personally recommend 1 step colder plugs and retarding 2 degrees base timing as well as running premium fuel AT ALL TIMES with even the 55 shot, and pulling 1 more degree of timing per 10 horsepower jet increase. i would also recommend 2 steps colder with a 75+ hp jet as well as closing the gap on the plugs to .028". i installed new plugs before my first N20 run and checked them directly after, looking for any signs of a lean condition, or detonation.
LASTLY, I WILL NOT BE HELD LIABLE FOR ANY DAMAGE THIS MODIFICATION CAUSES, ITS UP TO THE INSTALLER/OWNER TO MAKE SURE ALL THE INFO IS CORRECT, AND THAT THE INSTALL WAS DONE CORRECT. ENJOY.
1. remove negative battery terminal and intake arm assembly (intake pipe if you have aftermarket intake).
2. you have to figure out where you want to mount the NMU (nitrous management unit). keep in mind the stainless braided line is only 24" from the NMU to the nozzle, so make sure you have the NMU within 24" of where the N20 nozzle will be in the intake arm.
3. once you have the location picked out mount the NMU using the 4 included self tapping screws.
4. next, find a suitable ground close to the NMU location (shorter = better), i used a bolt near the brake proportioning valve. once you find the spot, route the wire to the location, cut to lenght, and crimp on supplied ground eyelet and attach.

5.find a nearby grommeted hole in the firewall, route the red lead on the NMU through that grommet into the passenger compartment. i chose the a/c line through-way only because the previous owner had the amp power wire ran through it already.

6. next, find the TPS connector and locate the middle wire (output voltage lead) its the center wire, red with a blue tracer to be exact. using the supplied T-tap crimp it around the wire, and route the WHITE wire from the NMU to it, cut it to lenght, crimp on the supplied male spade connector and connect them. *no pic here simple though* if needed i can get a picture
7. inside the passenger compartment now, decide where you want your arming switch. you will have to drill a 1/2" hole to mount the switch. with the switch mounted route the FUSED lead to a NON-used 12v ignition on source. i used a female spade connector and ran it directly to the male connector in the fusebox.
8. the other lead on the arming switch connect using the supplied quick connect to the RED wire on the NMU (the one you pushed through the firewall in step #5.
9. decide where you are going to mount the N20 nozzle in the intake arm. this step is pretty simple as optimal position is 6-12" from the throttle body, although, mine is closer just for the fact that my AEM CAI already had a 1/16" hole, using the supplied tap i tapped the hole and screwed the nozzled directly into the intake. if you are using one without an existing hole, or the factory plastic intake arm, you will need to drill a 1/2" hole, stick the provided bung through it, screw the nut to the inside (locktight is recommended) and screw the N20 nozzle into the bung. the nozzle has a dimple in one side indicating the direction of flow, you want it to face the throttle body of coarse.
10. install the N20 jet into the end of the nozzle and connect the supplied 24" stainless braided line to the nozzle and the other end to the NMU.
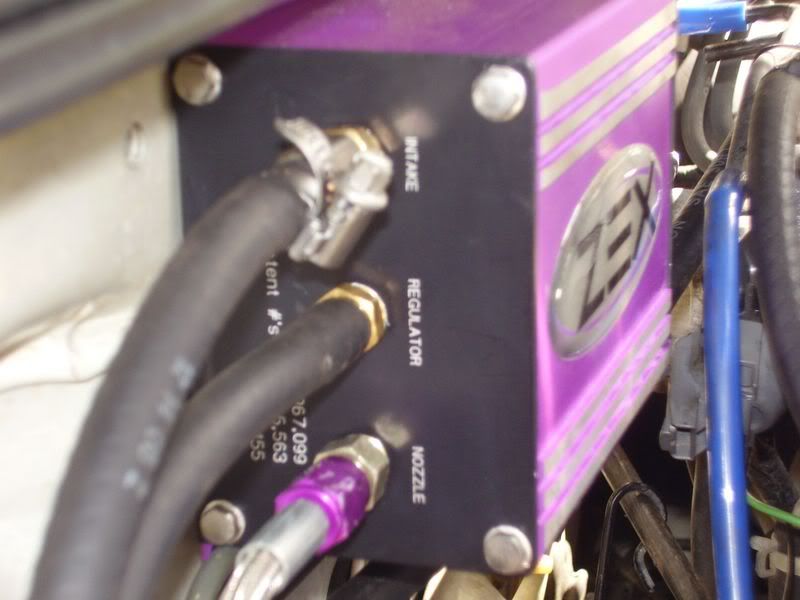
11. next, install corresponding fuel jet into NMU bung marked INTAKE, and using supplied nut and vacuum bung secure it to the NMU. find an unused vacuum source on the intake manifold and run the 3/16" vacuum line from the INTAKE bung on the NMU to that source. if you dont have an unused nipple on the intake manifold just T into one somewhere. secure both ends of the vacuum line with the supplied hose clamps

12. locate the fuel pressure regulator vacuum line, cut it directly in the middle and install vacuum T, using supplied 3/16" vacuum line connect vacuum line from T to NMU bung marked REGULATOR. secure both ends using supplied hose clamps. i use electrical tape over my T because its plastic and if it breaks it will cause you to run lean while spraying, the electrical tape will prevent any leaks if the T breaks.

13. now its time to mount the bottle, i placed the brackets on my bottle as far apart as i wanted them, and measured the distance from mount to mount. i then took the mounts inside the car and sat one down, marked where the holes needed to be, drilled the 2 5/16" holes and mounted that bracket, measured to get the distance apart from it i wanted and did the same for the other bracket, bolted them both down with the supplied nuts/bolts/washers, i grabbed some lock washers from work to make sure they stayed put. once the brackets were mounted i sprayed the bottom of the holes with undercoating, to prevent rust, road noise, and debri from entering the cabin of the car.
14. mount your bottle into the brackets noting the position is correct. one bracket is taller so the bottle does not lay flat. the label is to face up, and the fill valve end is to be higher than the flat end.
15. time to route your N20 supply line from the bottle to the NMU. its recommended to do this under the car by zex, nx, nos, holley, etc. but seeing as how our honda/acuras have all the fuel lines running inside the car i decided to use the same routing location. i pulled the bottom of the rear seat out, and the drivers side carpet trim up revealing all the fuel lines. i found a hole in the firewall beside the throttle cable that looked like a good place to enter the engine bay (still need to grommett that hole), and connected the N20 supply line to the NMU.

16. time to reconnect the battery, but do not install the intake arm to the throttle body yet. recheck all N20 connections are tight and open N20 bottle, check for leaks at ALL connections. if all connections seem good, turn bottle off.
17. programming the NMU to your TPS voltage curve. turn key on (engine OFF), activate arming switch, push the button on the NMU, the light should then glow solid red, return to driver seat and hold throttle to the floor for 10 FULL seconds, release throttle and look at light on the NMU, it should be flashing now, red green off red green off red green off, this shows that it has learned your TPS curve. turn arming switch off, leave ignition on, turn arming switch back on and the light on the NMU should now be solid GREEN, indicating that the system is armed.
18. open N20 bottle slowly, get back in drivers seat, and open the throttle WIDE OPEN until you see nitrous purging out your intake tube. this purges any trash that may be in the line as well as removes the air from the line.
19. FINALLY, turn off N20 arming switch, turn ignition OFF. re-install intake arm, recheck ALL connections, and wires are free of moving or hot engine parts.
20. GO FOR A SPIN, it is not recommended to activate N20 under 2500rpm, or in 5th gear (although 5th is fine in my opinion as long as RPM isnt under 3k, but this is sheer opinion)
i personally recommend 1 step colder plugs and retarding 2 degrees base timing as well as running premium fuel AT ALL TIMES with even the 55 shot, and pulling 1 more degree of timing per 10 horsepower jet increase. i would also recommend 2 steps colder with a 75+ hp jet as well as closing the gap on the plugs to .028". i installed new plugs before my first N20 run and checked them directly after, looking for any signs of a lean condition, or detonation.
LASTLY, I WILL NOT BE HELD LIABLE FOR ANY DAMAGE THIS MODIFICATION CAUSES, ITS UP TO THE INSTALLER/OWNER TO MAKE SURE ALL THE INFO IS CORRECT, AND THAT THE INSTALL WAS DONE CORRECT. ENJOY.