
imcnblu
Resident G2 Guru of C-I
Materials needed:
*a 10mL bottle of Tamiya Clear Yellow Acrylic Paint (there are bigger bottles, but you shouldn't need any more than this)
*a small glass or bowl to mix
*foam paint brush (you can get a 3pc kit from walmart for under $1)
*800, 1000, and 1500 grit WetSand paper (always use 3M products they make the best)
*a roll of masking tape
*a can of Automotive Clearcoat (you can get this stuff at ANY auto store, i happened to get mine at walmart)
*Turtle Wax Rubbing Compound (White container with RED label)
*Turtle Wax Polishing Compound (White container with GREEN label)
*TWO (2) CLEAN towels (must be soft and not have bristles, pretty much something you'd use to wax and polish your car with)
*A set of Foglights to paint (there are numerous options out there, find the size shape etc. you want and go from there)
******NOTE******
You can use pretty much ANY rubbing and polishing compounds you wish. 3M is always a good choice, i just used Turtle Wax products because they were what i had left from previous projects.
****************
And now, down to the nitty gritty:
Here is what the lights I used looked like to start with *sorry for the size of the pic, i can't resize either*

Step 1:
Use a little masking tape around the outside of the lense so you don't get paint on the housing or any hardware that may be permenantly attached to your lights, and to protect any wires that may come into contact with paint/clearcoat.
Step 2:
Use the 800 grit sandpaper and WETSAND the ENTIRE Lense. continue sanding the lense until there is an EVEN HAZE. Not scratchy, i mean a HAZE. This is a very critical step, as it provides an area for the paint to "Bite" onto.
Step 3:
Pour your paint into a small bowl, and mix a little bit of water (a little less than a shot-glass of water will be perfect)
this will give the Acrylic Paint a smooth texture and will apply MUCH smoother. Stir with pretty much any clean stirrer/spoon etc. as long as you dont mind it getting yellow paint on it.
Step 4:
Now that your paint is mixed, you are ready to begin painting. Take a FOAM PAINTBRUSH (prefferably with a 1" tip) and paint the lense evenly. After two coats the lense will look similar to this:
Step 5:
Apply as many coats as you wish until you achieve the desired shade of yellow you want. Wait about 5-6 minutes for the first coat to dry. Then wait 3-5 minutes between each additional coat. Use a Hairdryer during this phase if you wish to speed up the process. As long as you stay about 6-8 inches away from the lense on "Low" you will be FINE. This is the way I went and I haven't experienced ANY problems.
Step 6:
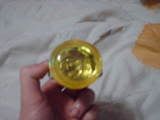
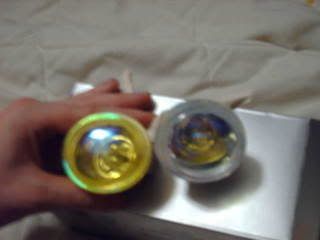
Now that you have the color you want, allow the paint to dry for about an hour at room temperature.
Here is what a lense will look like once its been painted, compared to the lense that HASN'T been painted yet:
Step 7:
After allowing the paint to cure for an hour or so, time to sand again. This time use the 1000 grit, and LIGHTLY (and I do mean LIGHTLY) wetsand the lense until you get a nice even haze again (shouldn't take as long as the last time you sanded) This is also critical, so the clear coat you will be using will have a surface to bite to as well. Also, this is to remove any raised areas in the paint (runs etc.) and to smooth out the surface of the paint
*no pic of this sorry*
*********IMPORTANT*********
Now would be a good time to find something to hold the lenses still (you don't want to get clear coat all over your hands and arms now do you?)
What I did was took the box they came in, and cut two holes in the box to hold them in place so i could clear coat them without having to hold them myself. Also, so you won't have to worry about finding a surface to set them on while they dry.
***************************
Step 8:
Apply 3-5 coats of clear to the lights. You can use more if you want, but 3 or 4 is all you really need. Personally, i used about 7 or 8 coats of clear to make sure the paint was protected well.
Apply the first coat relatively light.
**Feel free to use a hair dryer again, same deal as before**
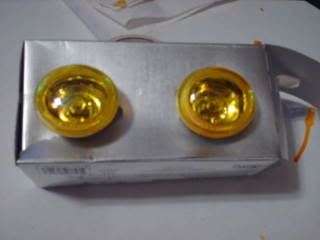
From the second coat, and on. You can apply the clear pretty heavily, but to make sure you get good coverage, I would go ahead and just apply around 5 light coats of clear. I applied the first coat lightly, and repeated for the 2nd and 3rd coats. But from the 4th coat, onward, I applied it pretty heavily. Not heavy enough for it to drip, but heavy enough to provide thick, uniform coverage.
Here is how my lights looked after i was done clear coating:
Step 9:
Let the clear coat "Cure" for about an hour, same as you did with the paint.
***NOTE***
You could Stop here, but if you want the lenses to appear as if they came yellow from the factory, AND you want them to be durable, you MAY want to continue on.
**********
Step 10:
Alright, we're on the home stretch, kids. Take out the 1500grit paper, and wetsand. And wetsand. And wetsand some more. Do this VERY LIGHTLY. About as light as you did before you clearcoated them. Repeat this until you get that HAZE effect back. You might think you are messing up your lenses because before you sanded, they looked SO NICE. But, TRUST ME. Sand until your lenses have the haze effect again.
Step 11:
Now, take one (1) of the clean, soft towels I told you to have, and use it to apply the RUBBING COMPOUND (RED LABEL if you're using Turtle Wax like I did) and rub the compound onto the surface of the lense. Use a little elbow grease (lol) but not too much, you don't want to crack the lense. Just enough strength to penetrate into the surface.
Flip the towel over and rub off the excess.
The lights will now look pretty nice again. BUT, here is where they will look GORGEOUS.
Step 12:
Now, use a DIFFERENT TOWEL and use the POLISHING COMPOUND (GREEN LABEL if you are using Turtle Wax like I did) and repeat the same process as you did with the rubbing compound. Use enough force to penetrate the lense. As you rub this stuff in, you will notice the lense will become almost perfectly transparant (but OBVIOUSLY with a yellow tint lol).
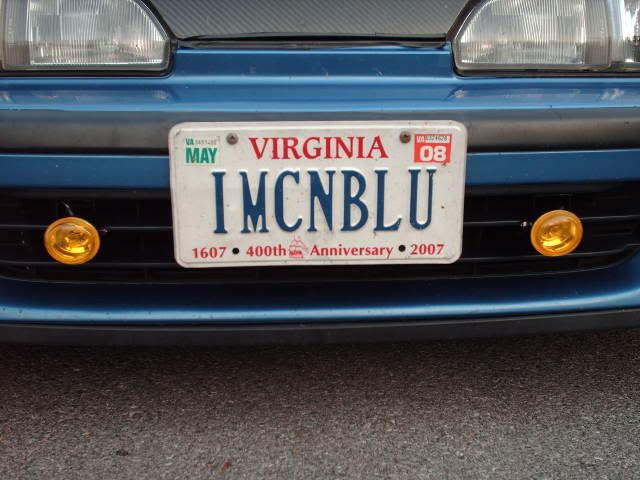
Now you are finished, and the lenses should look as if they came from the manufacturer yellow. Now go install those bad boys and post up the pics and show off your mad painting skills lol.
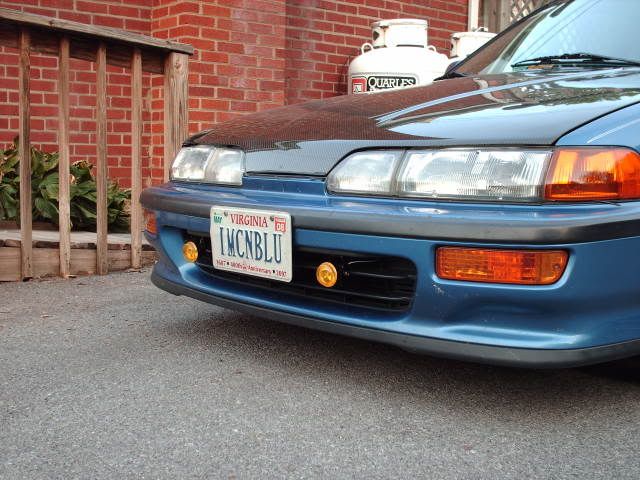
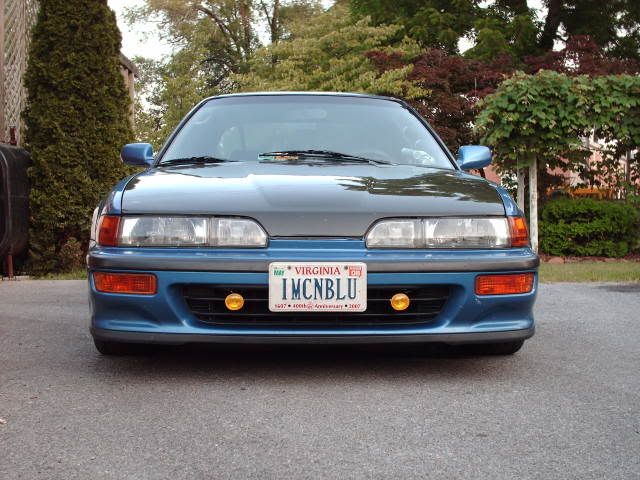
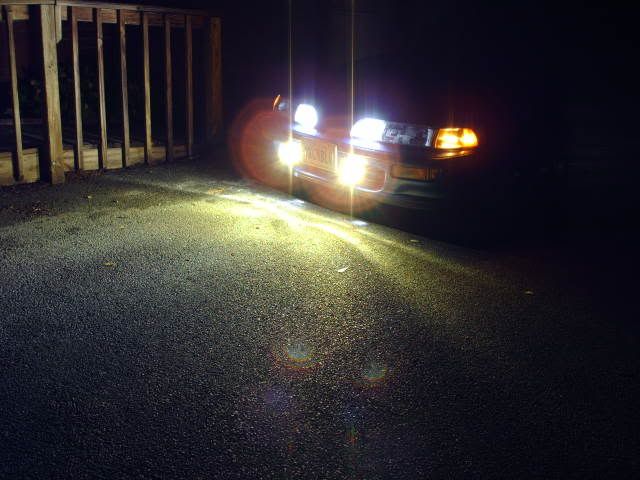
Here is what mine look like installed and lit up.
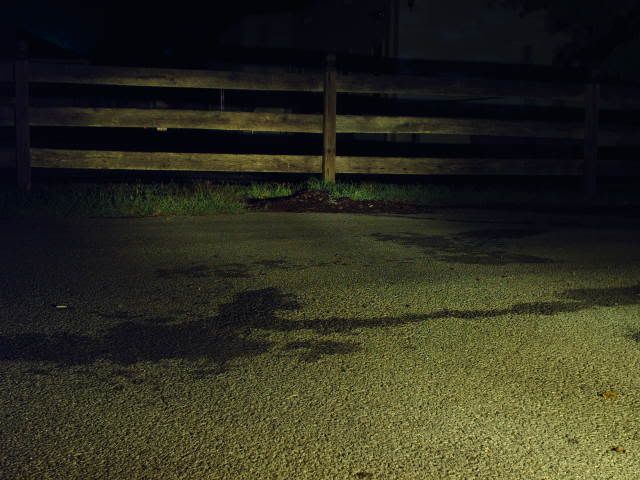
and the light output:
As you can tell, these were installed on a DA Integra, but this is a universal application. You could put these on anything.
*a 10mL bottle of Tamiya Clear Yellow Acrylic Paint (there are bigger bottles, but you shouldn't need any more than this)
*a small glass or bowl to mix
*foam paint brush (you can get a 3pc kit from walmart for under $1)
*800, 1000, and 1500 grit WetSand paper (always use 3M products they make the best)
*a roll of masking tape
*a can of Automotive Clearcoat (you can get this stuff at ANY auto store, i happened to get mine at walmart)
*Turtle Wax Rubbing Compound (White container with RED label)
*Turtle Wax Polishing Compound (White container with GREEN label)
*TWO (2) CLEAN towels (must be soft and not have bristles, pretty much something you'd use to wax and polish your car with)
*A set of Foglights to paint (there are numerous options out there, find the size shape etc. you want and go from there)
******NOTE******
You can use pretty much ANY rubbing and polishing compounds you wish. 3M is always a good choice, i just used Turtle Wax products because they were what i had left from previous projects.
****************
And now, down to the nitty gritty:
Here is what the lights I used looked like to start with *sorry for the size of the pic, i can't resize either*

Step 1:
Use a little masking tape around the outside of the lense so you don't get paint on the housing or any hardware that may be permenantly attached to your lights, and to protect any wires that may come into contact with paint/clearcoat.
Step 2:
Use the 800 grit sandpaper and WETSAND the ENTIRE Lense. continue sanding the lense until there is an EVEN HAZE. Not scratchy, i mean a HAZE. This is a very critical step, as it provides an area for the paint to "Bite" onto.
Step 3:
Pour your paint into a small bowl, and mix a little bit of water (a little less than a shot-glass of water will be perfect)
this will give the Acrylic Paint a smooth texture and will apply MUCH smoother. Stir with pretty much any clean stirrer/spoon etc. as long as you dont mind it getting yellow paint on it.
Step 4:
Now that your paint is mixed, you are ready to begin painting. Take a FOAM PAINTBRUSH (prefferably with a 1" tip) and paint the lense evenly. After two coats the lense will look similar to this:
Step 5:
Apply as many coats as you wish until you achieve the desired shade of yellow you want. Wait about 5-6 minutes for the first coat to dry. Then wait 3-5 minutes between each additional coat. Use a Hairdryer during this phase if you wish to speed up the process. As long as you stay about 6-8 inches away from the lense on "Low" you will be FINE. This is the way I went and I haven't experienced ANY problems.
Step 6:
Now that you have the color you want, allow the paint to dry for about an hour at room temperature.
Here is what a lense will look like once its been painted, compared to the lense that HASN'T been painted yet:
Step 7:
After allowing the paint to cure for an hour or so, time to sand again. This time use the 1000 grit, and LIGHTLY (and I do mean LIGHTLY) wetsand the lense until you get a nice even haze again (shouldn't take as long as the last time you sanded) This is also critical, so the clear coat you will be using will have a surface to bite to as well. Also, this is to remove any raised areas in the paint (runs etc.) and to smooth out the surface of the paint
*no pic of this sorry*
*********IMPORTANT*********
Now would be a good time to find something to hold the lenses still (you don't want to get clear coat all over your hands and arms now do you?)
What I did was took the box they came in, and cut two holes in the box to hold them in place so i could clear coat them without having to hold them myself. Also, so you won't have to worry about finding a surface to set them on while they dry.
***************************
Step 8:
Apply 3-5 coats of clear to the lights. You can use more if you want, but 3 or 4 is all you really need. Personally, i used about 7 or 8 coats of clear to make sure the paint was protected well.
Apply the first coat relatively light.
**Feel free to use a hair dryer again, same deal as before**
From the second coat, and on. You can apply the clear pretty heavily, but to make sure you get good coverage, I would go ahead and just apply around 5 light coats of clear. I applied the first coat lightly, and repeated for the 2nd and 3rd coats. But from the 4th coat, onward, I applied it pretty heavily. Not heavy enough for it to drip, but heavy enough to provide thick, uniform coverage.
Here is how my lights looked after i was done clear coating:
Step 9:
Let the clear coat "Cure" for about an hour, same as you did with the paint.
***NOTE***
You could Stop here, but if you want the lenses to appear as if they came yellow from the factory, AND you want them to be durable, you MAY want to continue on.
**********
Step 10:
Alright, we're on the home stretch, kids. Take out the 1500grit paper, and wetsand. And wetsand. And wetsand some more. Do this VERY LIGHTLY. About as light as you did before you clearcoated them. Repeat this until you get that HAZE effect back. You might think you are messing up your lenses because before you sanded, they looked SO NICE. But, TRUST ME. Sand until your lenses have the haze effect again.
Step 11:
Now, take one (1) of the clean, soft towels I told you to have, and use it to apply the RUBBING COMPOUND (RED LABEL if you're using Turtle Wax like I did) and rub the compound onto the surface of the lense. Use a little elbow grease (lol) but not too much, you don't want to crack the lense. Just enough strength to penetrate into the surface.
Flip the towel over and rub off the excess.
The lights will now look pretty nice again. BUT, here is where they will look GORGEOUS.
Step 12:
Now, use a DIFFERENT TOWEL and use the POLISHING COMPOUND (GREEN LABEL if you are using Turtle Wax like I did) and repeat the same process as you did with the rubbing compound. Use enough force to penetrate the lense. As you rub this stuff in, you will notice the lense will become almost perfectly transparant (but OBVIOUSLY with a yellow tint lol).
Now you are finished, and the lenses should look as if they came from the manufacturer yellow. Now go install those bad boys and post up the pics and show off your mad painting skills lol.
Here is what mine look like installed and lit up.
and the light output:
As you can tell, these were installed on a DA Integra, but this is a universal application. You could put these on anything.