
Tree's...Roadster?
- Thread starter treeafodo
- Start date

treeafodo
Austin
I'd have to trim it quite a bit to clear my roll bar:lol:Don't forget to pick up on of these

Did some cleaning on the chassis this weekend. Not as much as I'd like. School and work are draining me.
 Engine Bay Rust by Austin Rajki, on Flickr
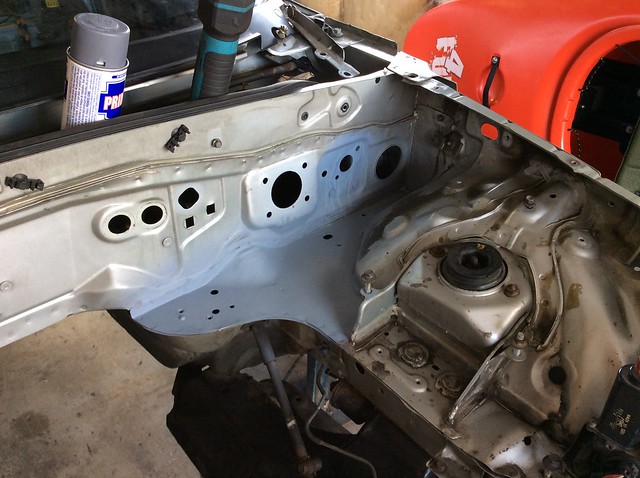 Rust Removed and Primed by Austin Rajki, on Flickr
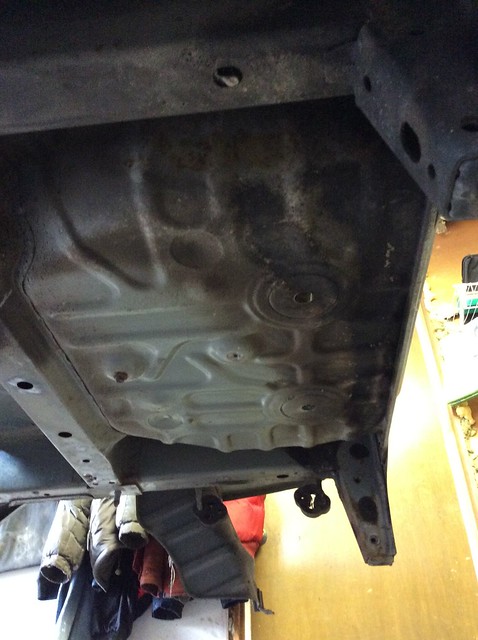
This is the under carriage in the trunk area. It's cleaning up quite well. The majority of it is just really caked on grime from 24 years of driving.
 Trunk Area by Austin Rajki, on Flickr
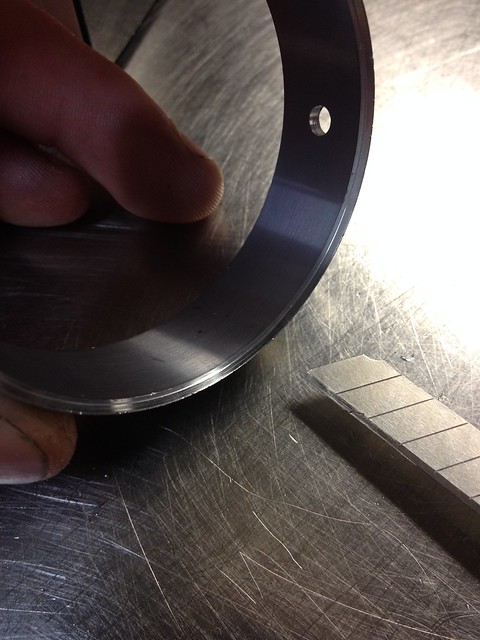
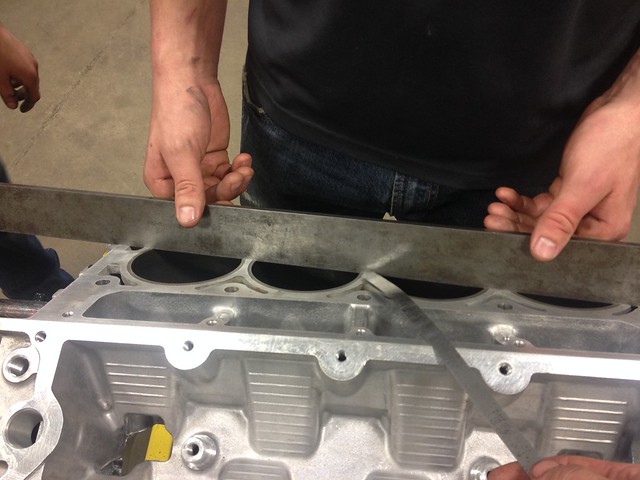
I ground my new intake valves today. Yet, I feel like the margins are still way too small. The only spec I have found is no smaller than 50 thou. I think I'm going to order new after market valves since I'm having no luck. I'd rather spend the extra money now then end up burning valves... I'm tired of spending money on stupid little things and it's starting to piss me off.
 New Intake Valves Ground by Austin Rajki, on Flickr
Then I used this crappy tool to clean the ring grooves. I'm just about done that, just 2 pistons to go.
 Ring Groove Cleaning by Austin Rajki, on Flickr
Then the only good news I've had for a while about this stupid thing has been that I got my heads back today. My friend did an excellent job gasket matching, porting and polishing these.
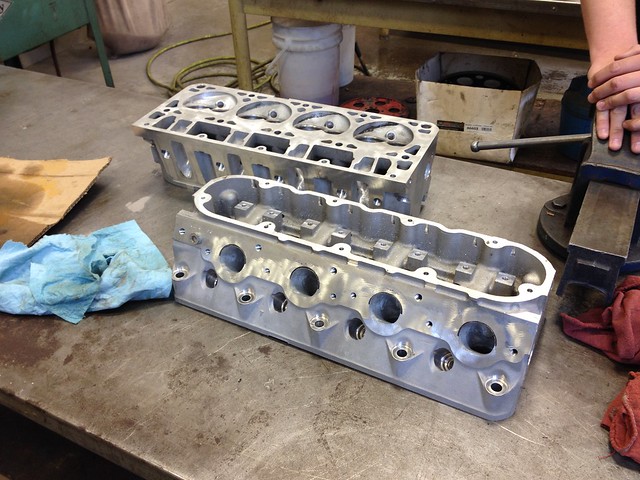 Ported and Polished Heads by Austin Rajki, on Flickr
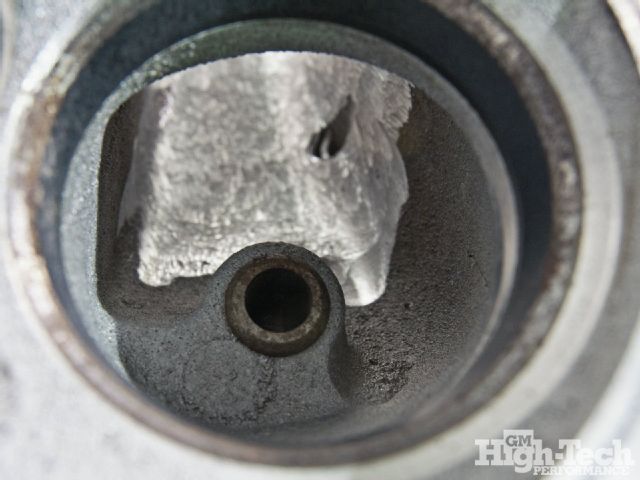
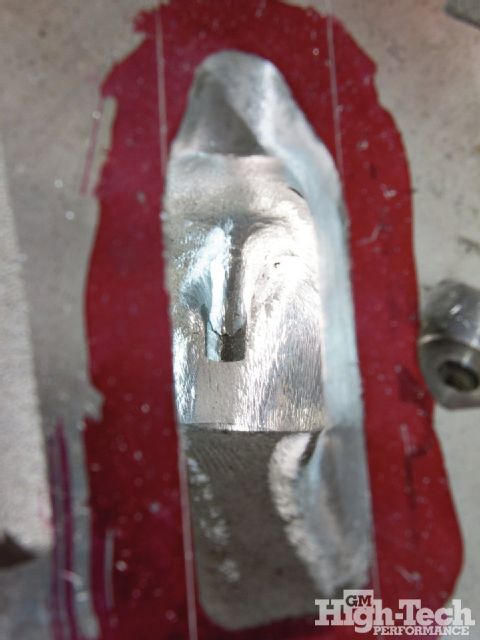
A few of the next couple pictures are from GM High-Tech just to give you an idea of how much porting has been done to them since I didn't take any before pictures and my cell phone is terrible at getting pictures inside the ports.
This is the stock exhaust port prior to gasket matching it.
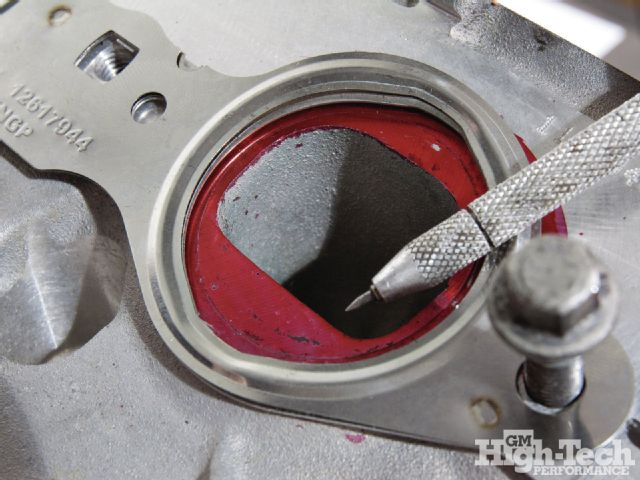 To be Gasket Matched by Austin Rajki, on Flickr
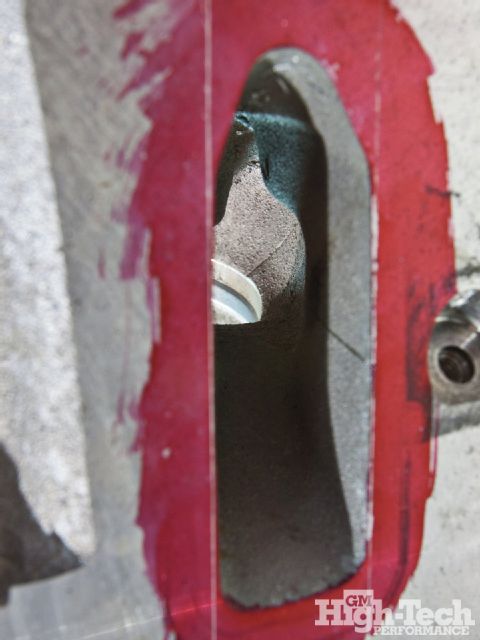
And my exhaust port now
 Exhaust Port by Austin Rajki, on Flickr
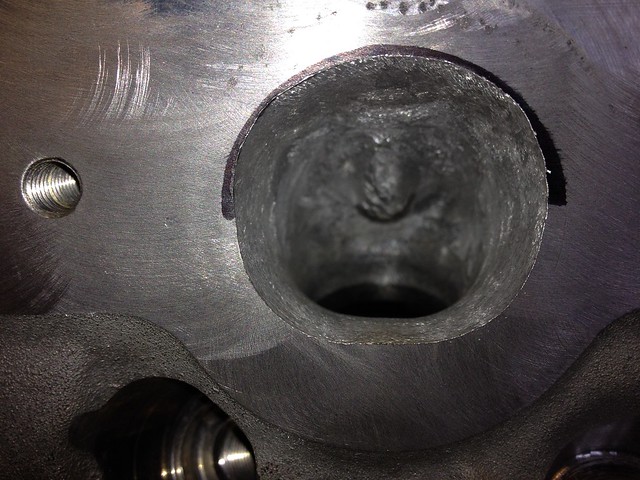
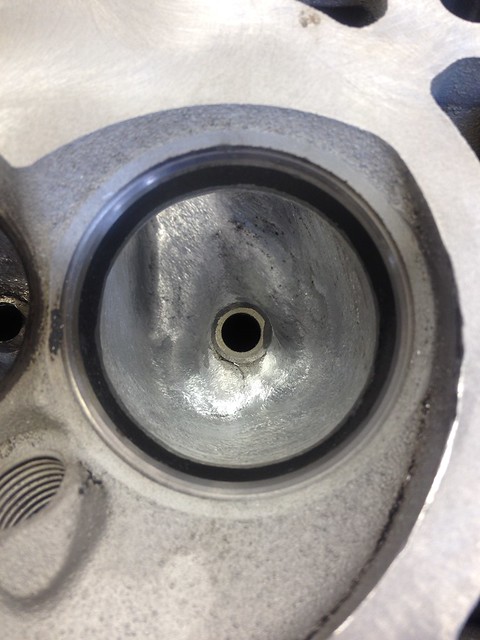
The Valve Guide area
 Valve Guide Area before Porting by Austin Rajki, on Flickr
and my valve guide area now. It has a nice air plane wing type shape
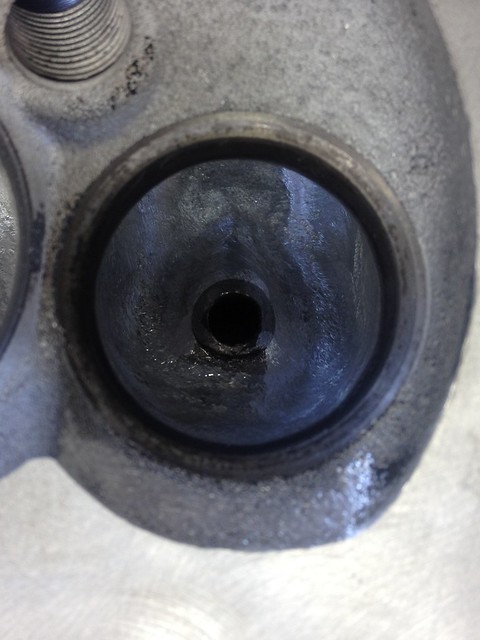 Intake Port by Austin Rajki, on Flickr
The stock intake port before porting. They are a pretty restrictive design and they have that huge "bulb" where the rocker arm bolts into.
 Before Porting by Austin Rajki, on Flickr
 Before Porting by Austin Rajki, on Flickr
And then this is the intake port after porting. This picture is from GM High Tech since my phone won't capture that. Mine looks identical though.
 Ported by Austin Rajki, on Flickr
As you can probably tell I am starting to get pretty aggravated. It's pretty stressful knowing I only have 2 maybe 3 labs left to essentially finish everything. I still have so much to do, like cutting new seats in the heads, install my trunion kit in the rockets, check bearing clearances and so on. Now I need to order yet another set of intake valves and hopefully have those in time. I can't wait until its over and I can go back to taking my time...

treeafodo
Austin
Thanks, Kurt. If it wasn't for the whole time restraint it would be a lot less stressful.
Hopefully you're able to get it out soon and check that.
Here is a picture of my intake port that I forgot to include.
Intake Port by Austin Rajki, on Flickr
Well I'm hoping I solved my valve dilemma. Just ordered new standard sized Manley Race Pro-Flo Intake and exhaust valves. Intakes have a 50 thou margin, exhaust has 65 thou. $370 I didn't want to spend. :suicide: On the plus side these should give me a little bit of a power gain increasing flow compared to the stock valves. Plus I'd rather reluctantly spend the money on new, aftermarket valves now then burn a stock valve, have to tear it all down, buy new valves and head gaskets. One and done.
Hopefully you're able to get it out soon and check that.
Here is a picture of my intake port that I forgot to include.
 Intake Port by Austin Rajki, on Flickr
Well I'm hoping I solved my valve dilemma. Just ordered new standard sized Manley Race Pro-Flo Intake and exhaust valves. Intakes have a 50 thou margin, exhaust has 65 thou. $370 I didn't want to spend. :suicide: On the plus side these should give me a little bit of a power gain increasing flow compared to the stock valves. Plus I'd rather reluctantly spend the money on new, aftermarket valves now then burn a stock valve, have to tear it all down, buy new valves and head gaskets. One and done.
treeafodo
Austin
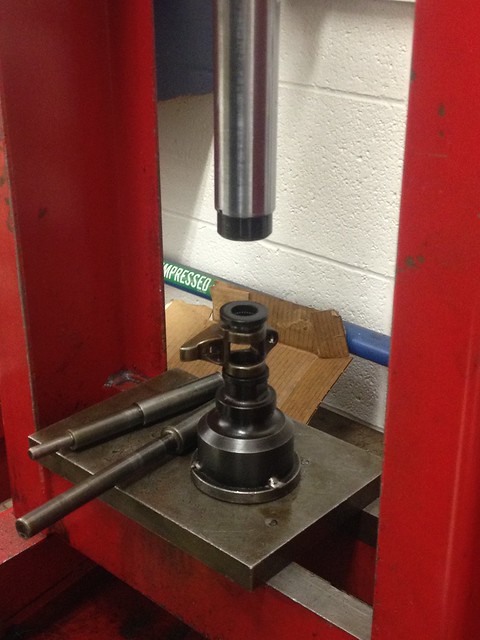
I was able to squeeze some time in the lab between a couple of my classes today. It was just enough time to install the Comp Cams Trunion retrofit kit.
I got all the different drivers and other tools I needed to set up the press and proceeded to press all the OEM trunions and bearings out of the rocker arms.
Pressing Out Bearings and Trunions by Austin Rajki, on Flickr
Bare rocker arm without any bearings in it.
Bare Rocker Arm by Austin Rajki, on Flickr
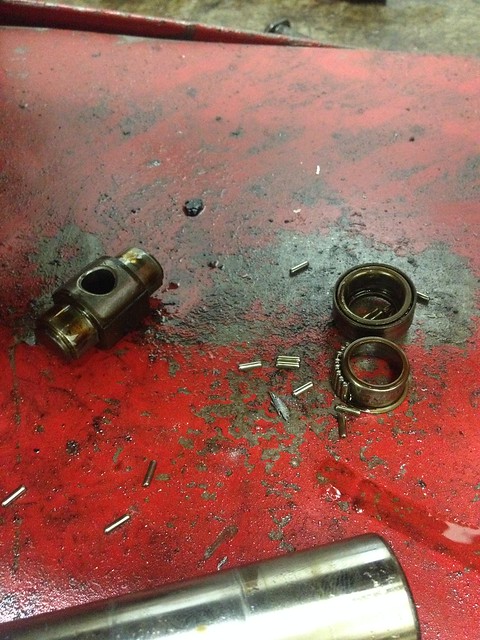
I guess the OEM bearings are notorious for spitting needle bearings inside the engine. I can see why.
Old Trunions and Crappy Bearings by Austin Rajki, on Flickr
Old vs new. The OEM ones have a semi-circle design on the ends of the trunion that limit its movement. The new ones do not. They are also much larger and lot more beefy compared to the stock ones.
Old Vs New by Austin Rajki, on Flickr
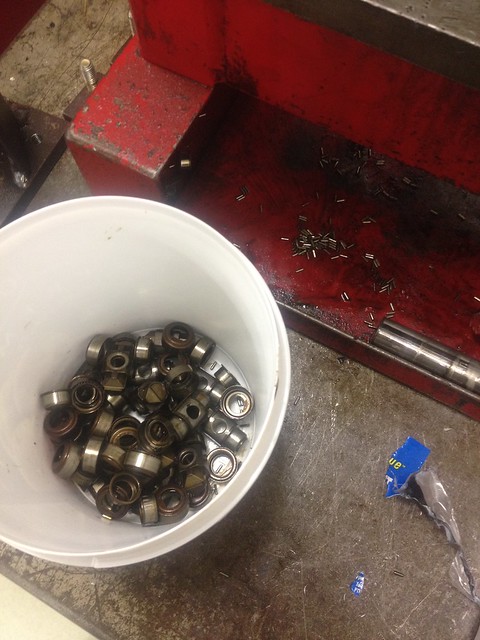
With all the old components removed I could move on to pressing the new parts in. Notice the needle bearings everywhere?
Bucket of Junk by Austin Rajki, on Flickr
Again, old vs. new
Old Vs New by Austin Rajki, on Flickr
The final step was to install retaining snap rings.
Installing Retaining Snap Rings by Austin Rajki, on Flickr
I got all the different drivers and other tools I needed to set up the press and proceeded to press all the OEM trunions and bearings out of the rocker arms.
 Pressing Out Bearings and Trunions by Austin Rajki, on Flickr
Bare rocker arm without any bearings in it.
 Bare Rocker Arm by Austin Rajki, on Flickr
I guess the OEM bearings are notorious for spitting needle bearings inside the engine. I can see why.
 Old Trunions and Crappy Bearings by Austin Rajki, on Flickr
Old vs new. The OEM ones have a semi-circle design on the ends of the trunion that limit its movement. The new ones do not. They are also much larger and lot more beefy compared to the stock ones.
 Old Vs New by Austin Rajki, on Flickr
With all the old components removed I could move on to pressing the new parts in. Notice the needle bearings everywhere?
 Bucket of Junk by Austin Rajki, on Flickr
Again, old vs. new
 Old Vs New by Austin Rajki, on Flickr
The final step was to install retaining snap rings.
 Installing Retaining Snap Rings by Austin Rajki, on Flickr
treeafodo
Austin
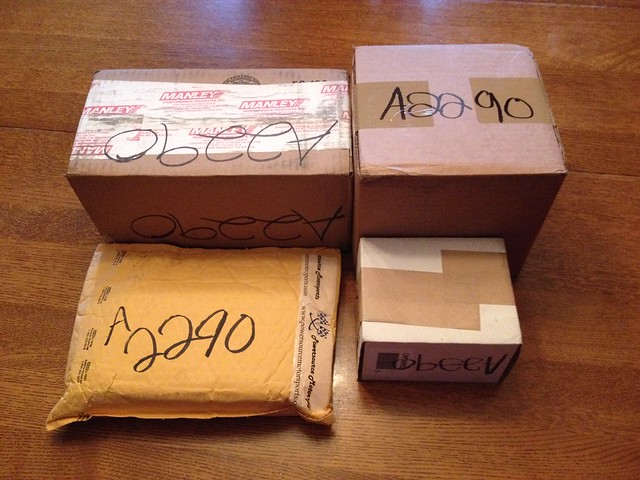
Every week is Christmas when you're building a race car!
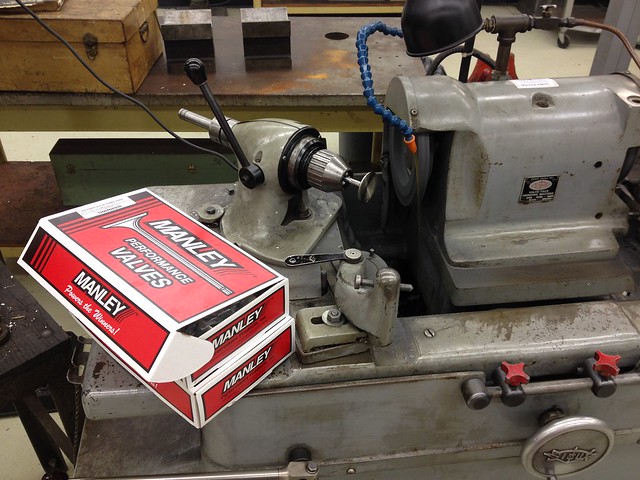
More Boxes by Austin Rajki, on Flickr
Goodies by Austin Rajki, on Flickr
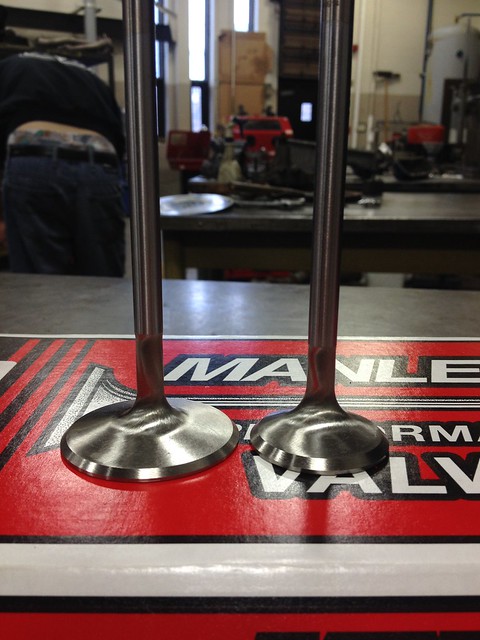
Manley Pro-Flow Race valves. Stainless steel once piece valves, Manley advertises up to a 42% increase in flow. That should be a good chunk of increased power.
Manley Pro-Flow Race Valves by Austin Rajki, on Flickr
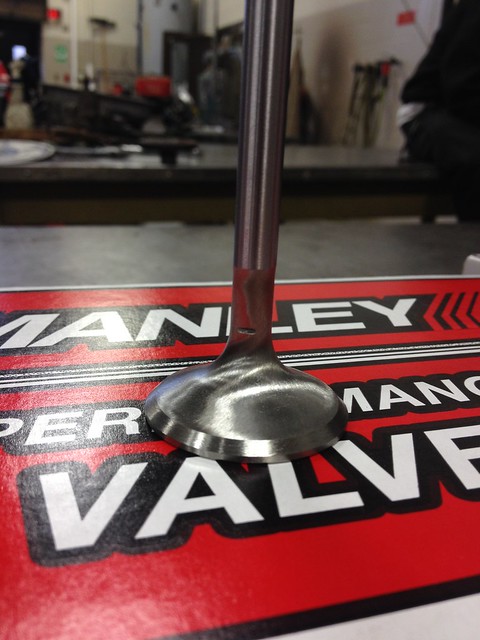
Oh look, an intake valve with a margin! Is this real life?!
Manley Pro-Flow Race Valves by Austin Rajki, on Flickr
 More Boxes by Austin Rajki, on Flickr
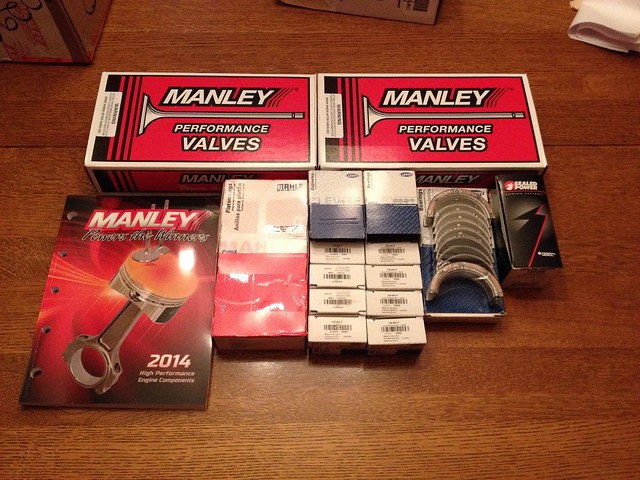 Goodies by Austin Rajki, on Flickr
Manley Pro-Flow Race valves. Stainless steel once piece valves, Manley advertises up to a 42% increase in flow. That should be a good chunk of increased power.
 Manley Pro-Flow Race Valves by Austin Rajki, on Flickr
Oh look, an intake valve with a margin! Is this real life?!
 Manley Pro-Flow Race Valves by Austin Rajki, on Flickr
JustinMcGee1
I like Hondas
How much power are you shooting for?
treeafodo
Austin
How much power are you shooting for?
450-500 rwhp NA
Sent from my iPhone using Tapatalk
treeafodo
Austin
Did more work on the LSx today.
I finally told my parents that I own this engine and I've been rebuilding it. lol
The cam bearings had some rough spots along the edges. I took a bearing blade to them just to chamfer the edge a bit. Now they're really nice.
Before Picture
Cam Bearing by Austin Rajki, on Flickr
And another familiar sight. Grinding the new valves just to make sure it's exactly 45 degrees with no high spots.
Grinding Again by Austin Rajki, on Flickr
Ground
Ground Manley Valves by Austin Rajki, on Flickr
And it wouldn't be my build thread without problems...
Garbage Manley Valve by Austin Rajki, on Flickr
This valve is garbage. The stopper on the valve grinder slipped on the 10th valve causing it to go too far and nick it. I knew as soon as my hand moved that far that the valve was toast... I'm pissed, but mistakes happen. I'm only human. My teacher is able to get me a new valve for $30, so not all is lost. It will be here in 7-10 days. I have a cool paper weight valve now.
I checked the block and heads for warpage. Not a spec of it. Not even .001" of warpage on either the block or heads.
Straight Block by Austin Rajki, on Flickr
Next up was to clean the bearing saddles really well and install the bearings and crank for a bearing clearance check. I put Plastigauge in each journal and tourqued everything down to spec.
Crank Laying in Saddles by Austin Rajki, on Flickr
Torquing the Mains by Austin Rajki, on Flickr
I was running short on time at this point and don't have any pictures, but all the bearing clearances were spot on! Not bad for a standard sized bearing and an engine with over 200,000 km on it.
I'm having a very difficult time cleaning the grooves in the pistons. I'm kind of concerned that the rings may have a hard time sitting correctly in them. I will have to address that.
I finally told my parents that I own this engine and I've been rebuilding it. lol
The cam bearings had some rough spots along the edges. I took a bearing blade to them just to chamfer the edge a bit. Now they're really nice.
Before Picture
 Cam Bearing by Austin Rajki, on Flickr
And another familiar sight. Grinding the new valves just to make sure it's exactly 45 degrees with no high spots.
 Grinding Again by Austin Rajki, on Flickr
Ground
 Ground Manley Valves by Austin Rajki, on Flickr
And it wouldn't be my build thread without problems...
 Garbage Manley Valve by Austin Rajki, on Flickr
This valve is garbage. The stopper on the valve grinder slipped on the 10th valve causing it to go too far and nick it. I knew as soon as my hand moved that far that the valve was toast... I'm pissed, but mistakes happen. I'm only human. My teacher is able to get me a new valve for $30, so not all is lost. It will be here in 7-10 days. I have a cool paper weight valve now.
I checked the block and heads for warpage. Not a spec of it. Not even .001" of warpage on either the block or heads.
 Straight Block by Austin Rajki, on Flickr
Next up was to clean the bearing saddles really well and install the bearings and crank for a bearing clearance check. I put Plastigauge in each journal and tourqued everything down to spec.
 Crank Laying in Saddles by Austin Rajki, on Flickr
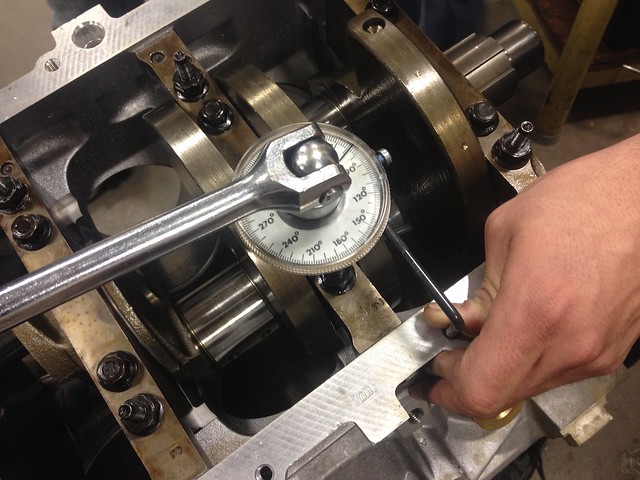 Torquing the Mains by Austin Rajki, on Flickr
I was running short on time at this point and don't have any pictures, but all the bearing clearances were spot on! Not bad for a standard sized bearing and an engine with over 200,000 km on it.
I'm having a very difficult time cleaning the grooves in the pistons. I'm kind of concerned that the rings may have a hard time sitting correctly in them. I will have to address that.
R13
The other asshole
You're so close! :thumbs up
I feel you though, I'm so close to having it back together but I'm hesitant to put any major parts back together without researching everything a ton out of fear of screwing something up, It's making me feel stretched for time even though I'm not really.
I feel you though, I'm so close to having it back together but I'm hesitant to put any major parts back together without researching everything a ton out of fear of screwing something up, It's making me feel stretched for time even though I'm not really.
treeafodo
Austin
I completely understand that. I ask my teacher a lot of things before I do anything, just to make sure it turns out correctly.You're so close! :thumbs up
I feel you though, I'm so close to having it back together but I'm hesitant to put any major parts back together without researching everything a ton out of fear of screwing something up, It's making me feel stretched for time even though I'm not really.
I appreciate the kind words. I'm excited as things are starting to come together, but also losing my patience since my luck has been so bad lately. I'm actually waiting for more bad news to pop up...very meticulous build, I love it. I'm excited to see how it turns out.
treeafodo
Austin
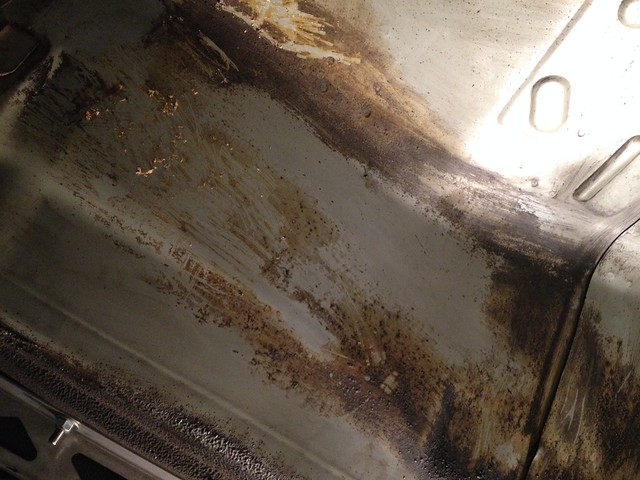
I ran out of Simple Green so I went to purchase some more to be able to continue cleaning up. The store I originally bought it from no longer carries it. I did some searching around and I found some Spray Nine which is pretty much the same idea. It was a pretty good deal. 4 liters for $18. I also picked up a new wire wheel which is a little bit different than my current one. I'm hoping that this one doesn't throw as many wires all over the garage. Lastly I bought some High temp gasket maker to seal up my rocker arm bolts.
Cleaning Supplies by Austin Rajki, on Flickr
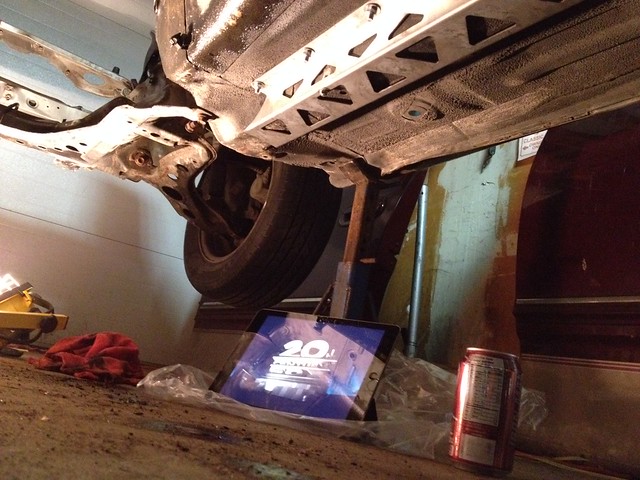
I'm getting tired of cleaning wheel wells, so I decided to take a break and clean the trans tunnel.
Dirty Trans Tunnel by Austin Rajki, on Flickr
I put a movie on and got to work.
Movie Night with Bae by Austin Rajki, on Flickr
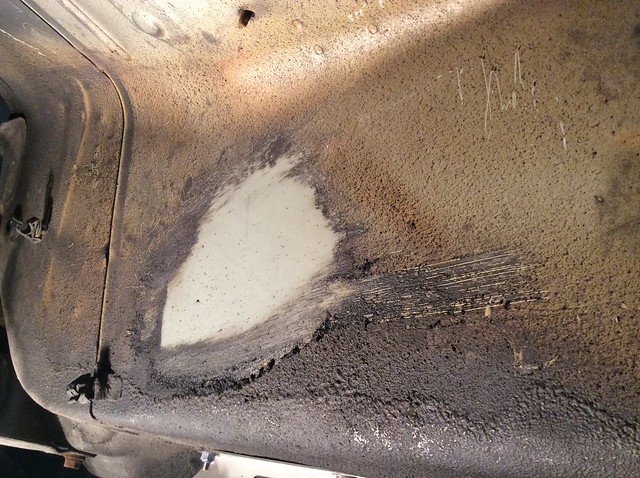
First impressions of Spray Nine: It works really well, but it's pretty caustic compared to the Simple Green.
Some spots were really easy to come clean
Coming Clean by Austin Rajki, on Flickr
While other spots are super baked on and a pain to remove.
Coming Clean by Austin Rajki, on Flickr
That's all for tonight. I have class early in the morning and work right after that. As always I will post progress pics as I go. Nothing too exciting.
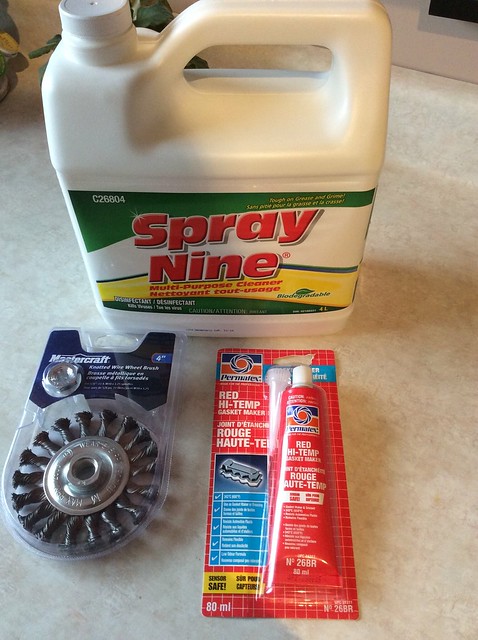 Cleaning Supplies by Austin Rajki, on Flickr
I'm getting tired of cleaning wheel wells, so I decided to take a break and clean the trans tunnel.
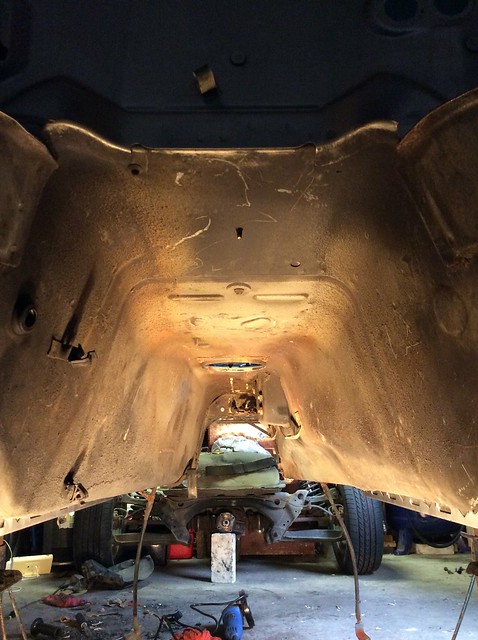 Dirty Trans Tunnel by Austin Rajki, on Flickr
I put a movie on and got to work.
 Movie Night with Bae by Austin Rajki, on Flickr
First impressions of Spray Nine: It works really well, but it's pretty caustic compared to the Simple Green.
Some spots were really easy to come clean
 Coming Clean by Austin Rajki, on Flickr
While other spots are super baked on and a pain to remove.
 Coming Clean by Austin Rajki, on Flickr
That's all for tonight. I have class early in the morning and work right after that. As always I will post progress pics as I go. Nothing too exciting.
treeafodo
Austin
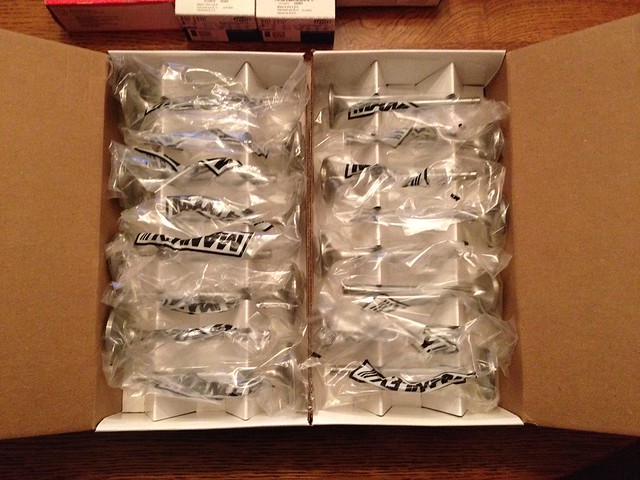
I ordered some of the last few pieces to the puzzle.
Mellings ported, high pressure oil pump
Comp Cams cam lock plate
OEM GM cam thrust plate/retainer
OEM GM bolts for the new thrust plate. GM changed the design of the thrust plate in the later years. Mine has hex head bolts, where the new thrust plate design has counter sunk holes to allow the use of a cam phaser. They discontinued the style that I have so I needed the counter sunk bolts for it.
Sent from my iPhone using Tapatalk
Ted's Owner
On to Integra number two!
Favorite build on Club Integra hands down.