Tree's...Roadster?
- Thread starter treeafodo
- Start date
treeafodo
Austin
Lately I've been very lazy and only taking one picture. I need to start taking better pictures.Mmm... Dat progress.
How many times do you take the same picture until you get the one you want? Usually when I'm working on stuff I just snap one and it ends up being terrible. :lol: I'm in grease monkey mode, Never photographer mode.
Sent from my iPad using Tapatalk
treeafodo
Austin
Thanks man!They look good, Clarity is good.
I go through my phone after doing something and I just think to myself "Nope, I'm not gonna post that." :lol:
I'd still post them if I were you. It's cool to see the progress you make throughout the build.
Sent from my iPad using Tapatalk
treeafodo
Austin
After a huge headache of dealing with UPS, I finally received my Flyin' Miata frame rails that I ordered New Year's Eve. UPS delivered them to the wrong house and then started to ship them back to Flyin' Miata in Colorado once the other house refused them. I will be filing a claim and hopefully will get back my $91 for shipping since I had to have it shipped to my Canadian address.
Anyways, this is the long awaited package.
New Box! by Austin Rajki, on Flickr
Flyin Miata Frame Rails by Austin Rajki, on Flickr
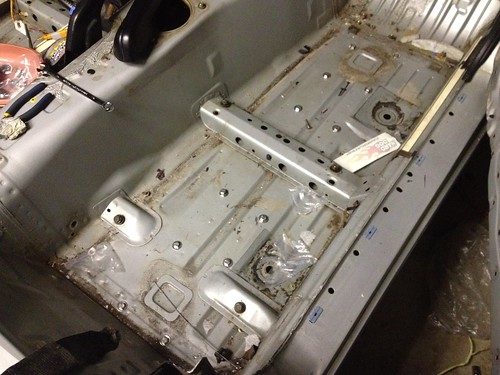
My frame rails are in really good shape so the install went pretty easily. I decided to do the passenger side rail first since it would be the more difficult of the 2 due to the brake/fuel lines.
A little while later I called it a night. With the 4 outermost bolts tight and all the other bolts started I just couldn't take any more crawling in and out from under the car. My abs are super sore from learning new kayak tricks and I have to be up early tomorrow morning.
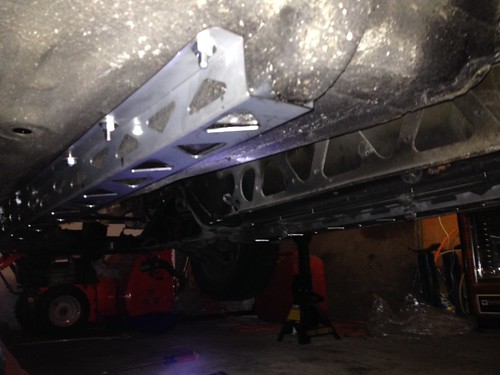
Installed by Austin Rajki, on Flickr
Installed by Austin Rajki, on Flickr
I will finish tightening that rail up and start the driver side install. I will update this thread tomorrow with a little more detail.
Anyways, this is the long awaited package.
 New Box! by Austin Rajki, on Flickr
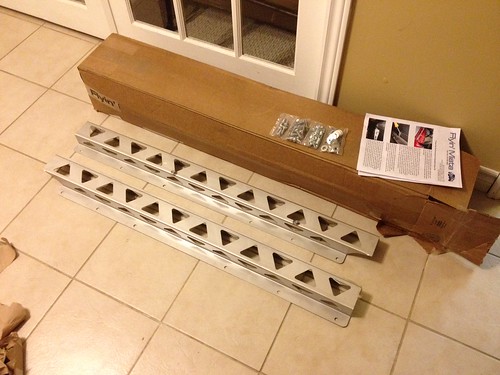 Flyin Miata Frame Rails by Austin Rajki, on Flickr
My frame rails are in really good shape so the install went pretty easily. I decided to do the passenger side rail first since it would be the more difficult of the 2 due to the brake/fuel lines.
A little while later I called it a night. With the 4 outermost bolts tight and all the other bolts started I just couldn't take any more crawling in and out from under the car. My abs are super sore from learning new kayak tricks and I have to be up early tomorrow morning.
 Installed by Austin Rajki, on Flickr
 Installed by Austin Rajki, on Flickr
I will finish tightening that rail up and start the driver side install. I will update this thread tomorrow with a little more detail.
treeafodo
Austin
I was originally going to get the butterfly brace with it, but it will not clear the exhaust I am having built.looks good, how come you didn't get the butterfly brace with them?
Sent from my iPhone using Tapatalk
treeafodo
Austin
I installed the driver side frame rail this evening. That finishes off my frame rail install. Overall it was very straight forward and should make a big difference in the car.
Poopy cell phone pic.
Finished Frame Rails by Austin Rajki, on Flickr
Then this happened...
Uh oh... by Austin Rajki, on Flickr
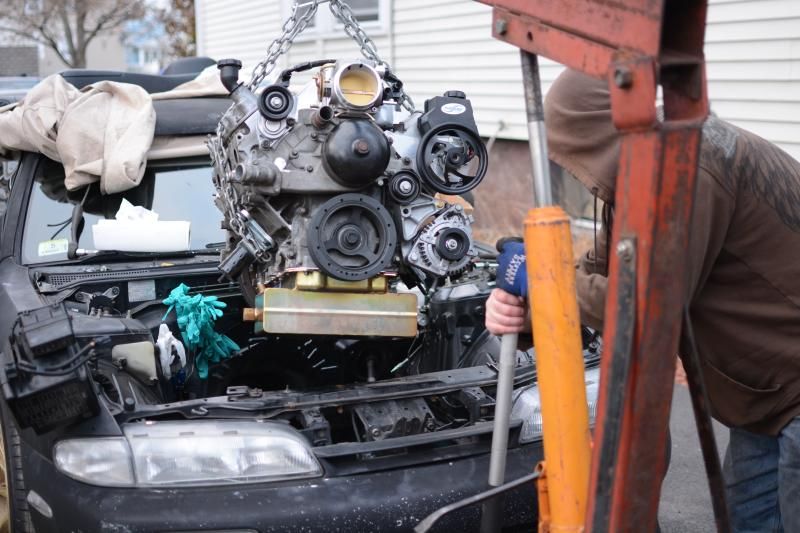
I left the house fairly early this morning to make the trip into the US to buy this LS1 longblock which I scored on eBay. I drove through the scariest neighbourhood in the world to get there. Every single building was abandoned with no windows or doors. I did not see a single occupied building driving through there. Any ways, the workers at the warehouse helped me load it into the back of my Integra for the trip home. It was a tight fit, but it worked well. The car drove like a dump truck. :lol:
By the time we got it into the car and I made the drive back it was almost time for class. I drove directly to school and unloaded the engine using the cherry picker. There were no free engine stands so it is just sitting on one of the workbenches for the time being.
LS1 Longblock by Austin Rajki, on Flickr
LS1 Longblock by Austin Rajki, on Flickr
LS1 Longblock by Austin Rajki, on Flickr
I have the engine stand I purchased earlier in my car and ready to bring to school tomorrow. I'm not entirely sure what the condition of the engine is in or even what is included with it. No word of a lie, I essentially got it for next to nothing. It came out of a '98 Corvette which was T-boned in the driver's rear quarter panel. The car had 128k miles on it. I saw pictures of the car it came out of and the engine bay was completely untouched.
I know for sure that it needs the intake manifold, fuel rail and injectors which would all have been upgraded anyways. It's definitely a little more complete than your average longblock.
I also picked up some new tools. I got a torque wrench, breaker bar and angle grinder. I purchased the angle grinder so I can remove all the surface rust on the car. The rust removal will have to wait until spring since it's way too cold for paint to stick properly.
Poopy cell phone pic.
 Finished Frame Rails by Austin Rajki, on Flickr
Then this happened...
 Uh oh... by Austin Rajki, on Flickr
I left the house fairly early this morning to make the trip into the US to buy this LS1 longblock which I scored on eBay. I drove through the scariest neighbourhood in the world to get there. Every single building was abandoned with no windows or doors. I did not see a single occupied building driving through there. Any ways, the workers at the warehouse helped me load it into the back of my Integra for the trip home. It was a tight fit, but it worked well.
The car drove like a dump truck. :lol:By the time we got it into the car and I made the drive back it was almost time for class. I drove directly to school and unloaded the engine using the cherry picker. There were no free engine stands so it is just sitting on one of the workbenches for the time being.
 LS1 Longblock by Austin Rajki, on Flickr
 LS1 Longblock by Austin Rajki, on Flickr
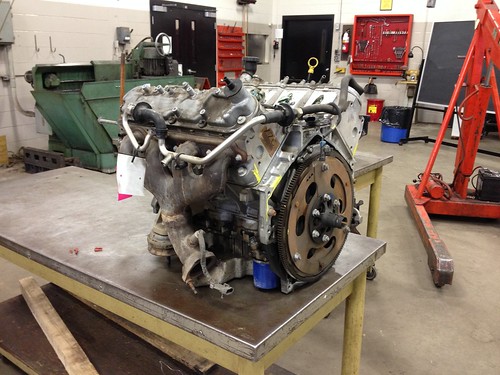 LS1 Longblock by Austin Rajki, on Flickr
I have the engine stand I purchased earlier in my car and ready to bring to school tomorrow. I'm not entirely sure what the condition of the engine is in or even what is included with it. No word of a lie, I essentially got it for next to nothing. It came out of a '98 Corvette which was T-boned in the driver's rear quarter panel. The car had 128k miles on it. I saw pictures of the car it came out of and the engine bay was completely untouched.
I know for sure that it needs the intake manifold, fuel rail and injectors which would all have been upgraded anyways. It's definitely a little more complete than your average longblock.
I also picked up some new tools. I got a torque wrench, breaker bar and angle grinder. I purchased the angle grinder so I can remove all the surface rust on the car. The rust removal will have to wait until spring since it's way too cold for paint to stick properly.
Ted's Owner
On to Integra number two!
Ermahgerd! Monster Miata build!
Yusss!!
Yusss!!
treeafodo
Austin
You have my word that I will not. Right after the engine is built I am putting money into removing any and all rust. The reason I stopped the Teg was rust was starting to spread from driving it in the winter. Because I have a daily this one won't have to worry about that.You better not drop out on this like the teg :lol:
This is too legit of a build. :thumbs up
Sent from my iPad using Tapatalk
treeafodo
Austin
I'm thinking the same thing as well. My fingers are crossed.At least it was an auto, shouldn't have been beat too bad.
Only time will tell.
Sent from my iPhone using Tapatalk
R13
The other asshole
Never know, I've seen more beat up auto's than manuals, Manual corvettes are less common though.
I'm sure it will be fine, Especially if you're going through it.
I'm sure it will be fine, Especially if you're going through it.
You have my word that I will not.